Authenticating users to a service is an essential part of mobile apps. It allows you to ensure the correct users are accessing your service and enables you to personalize what you offer them. There are many authentication methods available, but authenticating users via OAuth is a long time favorite for developers. It’s an open standard for authorization which allows users to sign in to applications using their accounts on other services (such as Facebook, Google etc) without giving the application access to any credentials. In this tutorial, I’ll look at cordovaOAuth is an AngularJS extension which allows mobile developers to add Oauth authorization to their Cordova based apps as simple as possible.
The Project
There are a lot of third party websites which provide OAuth authorization, the most popular being Google, Facebook, GitHub, and LinkedIn. In this tutorial, I’ll show you how to implement OAuth authorization using a Google account with the help of $cordovaOauth. I’ll use the Ionic framework for creating the mobile app. If you’ve never used Ionic before, I recommend you read my tutorial, “Creating a Bucket List with the Ionic Framework and Firebase“
The source code from this tutorial is available on GitHub.
Getting Started
You will need to install Cordova (I recommend SitePoint’s QuickTip) and the Ionic framework (again, I recommend SitePoint’s QuickTip)
Note: This example will use the Android platform.
Create an Ionic app using the tabs template.
ionic start myGoogleIonicApp tabs
Navigate to the project directory myGoogleIonicApp and run the server.
ionic serve
You should now have the app running at http://localhost:8100.
Installing ngCordova and $cordovaOauth
Navigate to the myGoogleIonicApp directory and install ngCordova using bower (Yes, of course SitePoint has a QuickTip!).
bower install ngCordova
Include the ngCordova script before the cordova script in the index.html page.
<script src="lib/ngCordova/dist/ng-cordova.js"></script>
<script src="cordova.js"></script>
Add the $cordovaOauth plugin to the project.
cordova plugin add https://git-wip-us.apache.org/repos/asf/cordova-plugin-inappbrowser.git
Install ng-cordova-oauth in the project.
bower install ng-cordova-oauth
Include the $cordovaOauth script after the ngCordova script in the index.html page.
<script src="lib/ng-cordova-oauth/dist/ng-cordova-oauth.js"></script>
Creating the User Interface
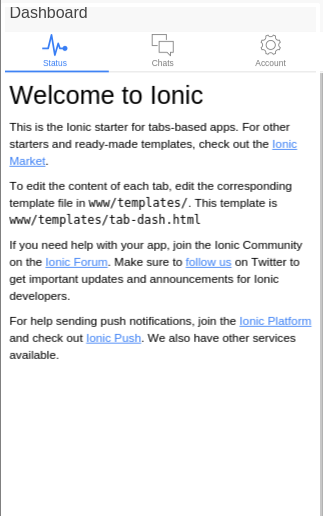
Navigate to www/templates/tab-dash.html and replace the existing code with this code:
<ion-view view-title="Dashboard">
  <ion-content class="padding">
    <h2>Welcome to Ionic</h2>
    <div>
      <a href="" ng-click="googleLogin()"><button>Login With Google</button></a>
    </div>
  </ion-content>
</ion-view>
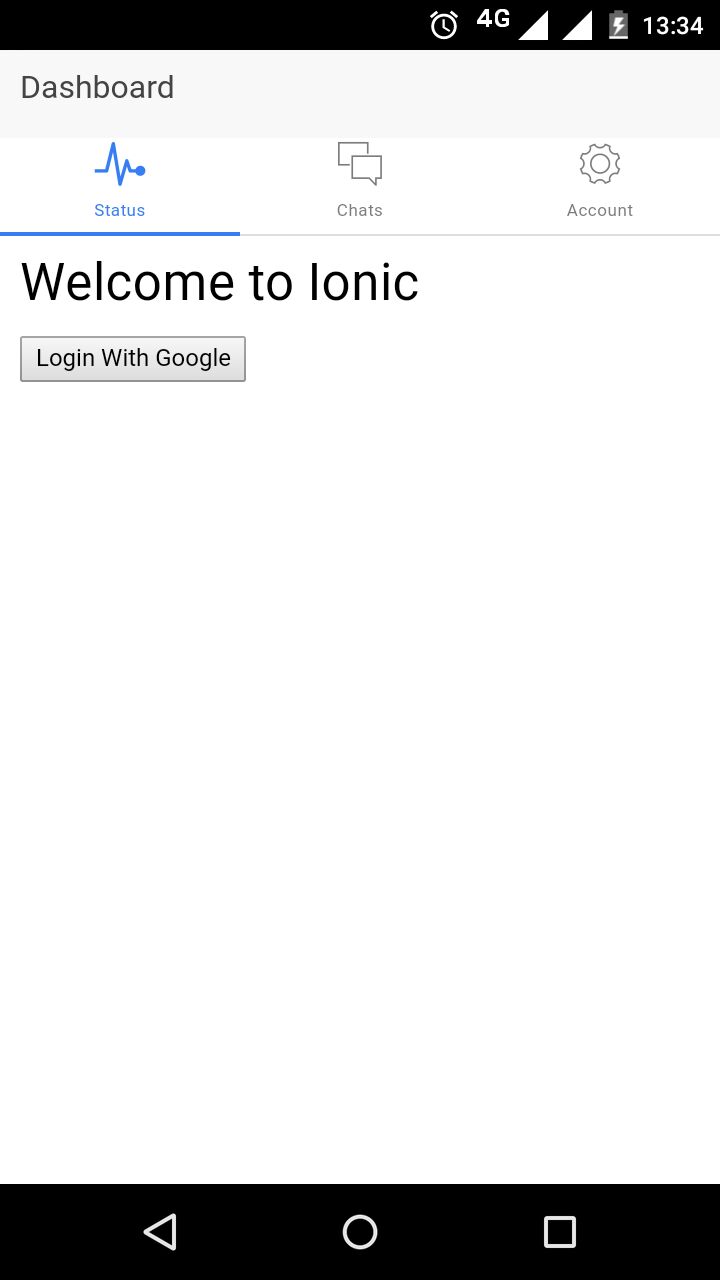
Add the Android platform to the mobile app and build the code:
ionic platform add android
ionic build android
Run the application with:
ionic run android
And you should see the below:
Implementing OAuth Using Google Login
Navigate to www/js/app.js and inject the ngCordova and ngCordovaOauth module.
angular.module('starter', ['ionic', 'starter.controllers', 'starter.services','ngCordova','ngCordovaOauth'])
Inside www/js/controllers.js add the googleLogin function inside DashCtrl as shown :
.controller('DashCtrl', function($scope, $cordovaOauth, $http) {

    $scope.googleLogin = function() {
        $cordovaOauth.google("app-id", ["email", "profile"]).then(function(result) {

        }, function(error) {

        });
    }
})
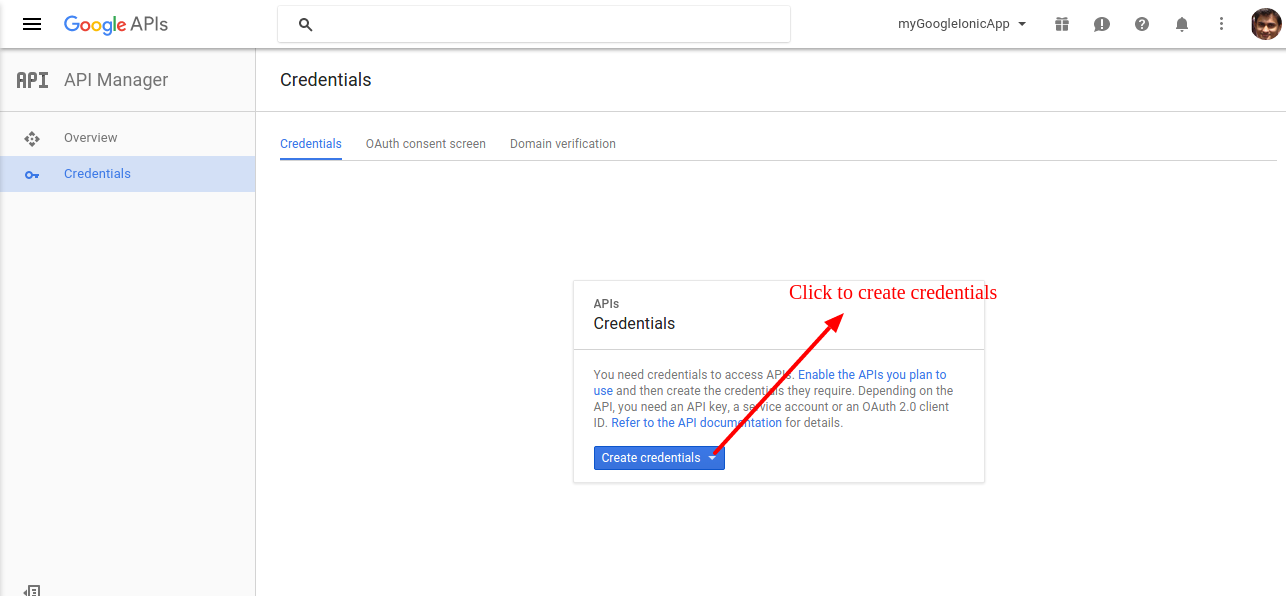
Breaking down the above code, you injected the cordovaOauth module into the DashCtrl controller, and using the cordovaOauth module you called the Google API. You will need an application key to enable Google OAuth Login which you can get from the Google developer console. Once logged in, click on the right side corner drop down to create a new project.
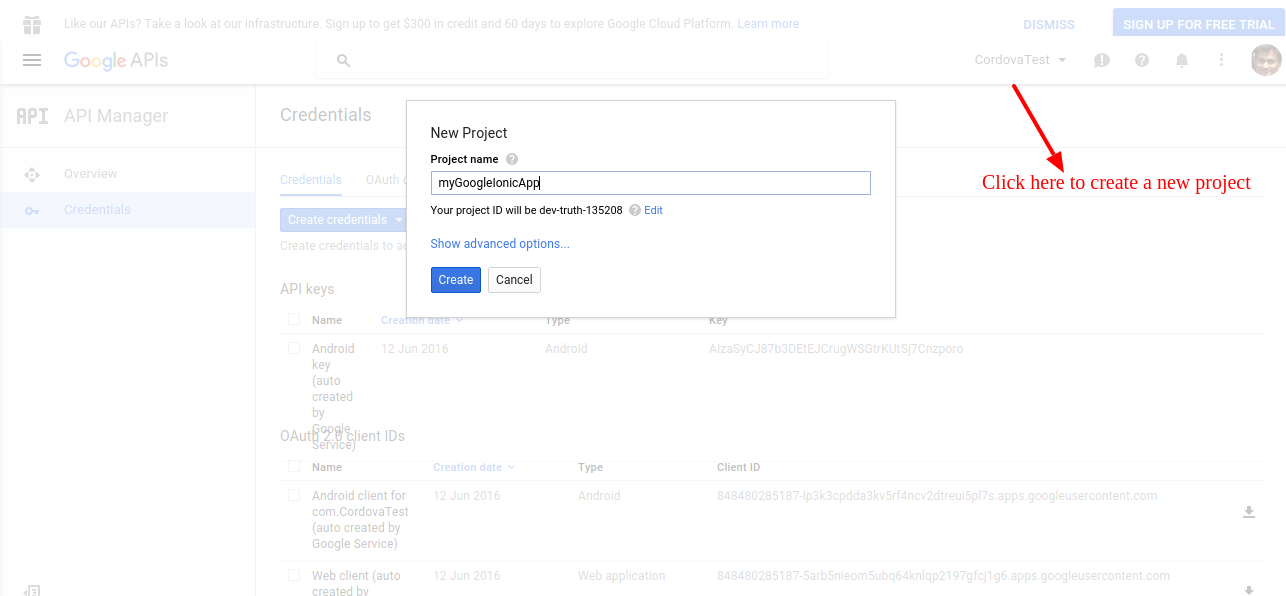
Click on the credentials tab on the left side menu and click the Create credentials button.
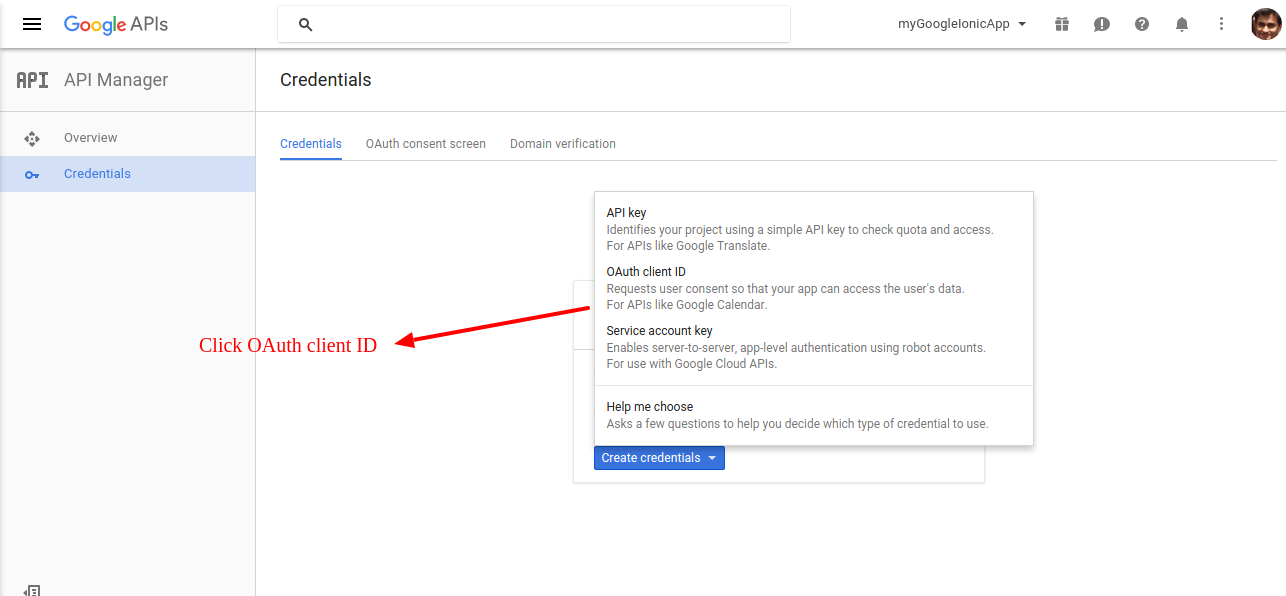
Select OAuth Client ID from the menu and click Create credentials.
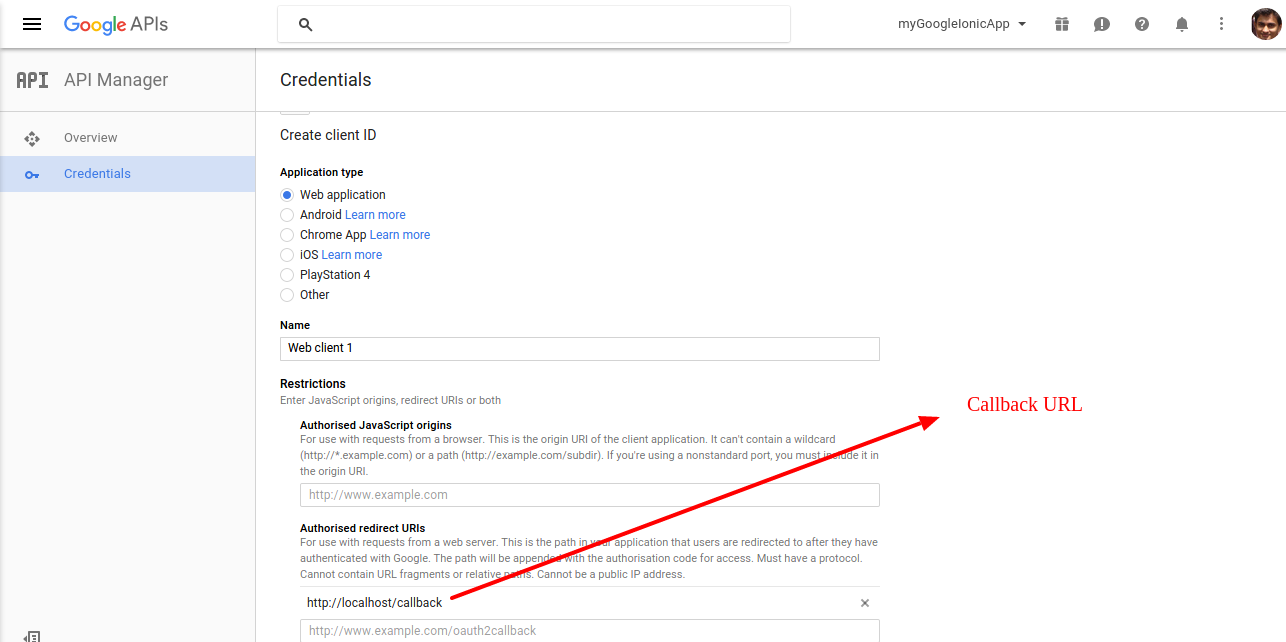
Select the Application type as Web Application, set the callback URL and click Create as shown :
Once you have created the client it should show the client ID, copy the value and add it to the googleLogin method in DashCtrl.
$scope.googleLogin = function() {
        $cordovaOauth.google("YOUR GOOGLE CLIENT ID", ["email", "profile"]).then(function(result) {
            $scope.details = result.access_token;
        }, function(error) {
          // Error code here
        });
    }
Next you need to bind the scope.details to the user interface to see if it works. Change www/templates/tab-dash.html as shown :
<ion-view view-title="Dashboard">
  <ion-content class="padding">
    <h2>Welcome to Ionic</h2>
    <div>
      <a href="" ng-click="googleLogin()"><button>Login With Google</button></a>
      <span>{{details}}</span>
    </div>
  </ion-content>
</ion-view>
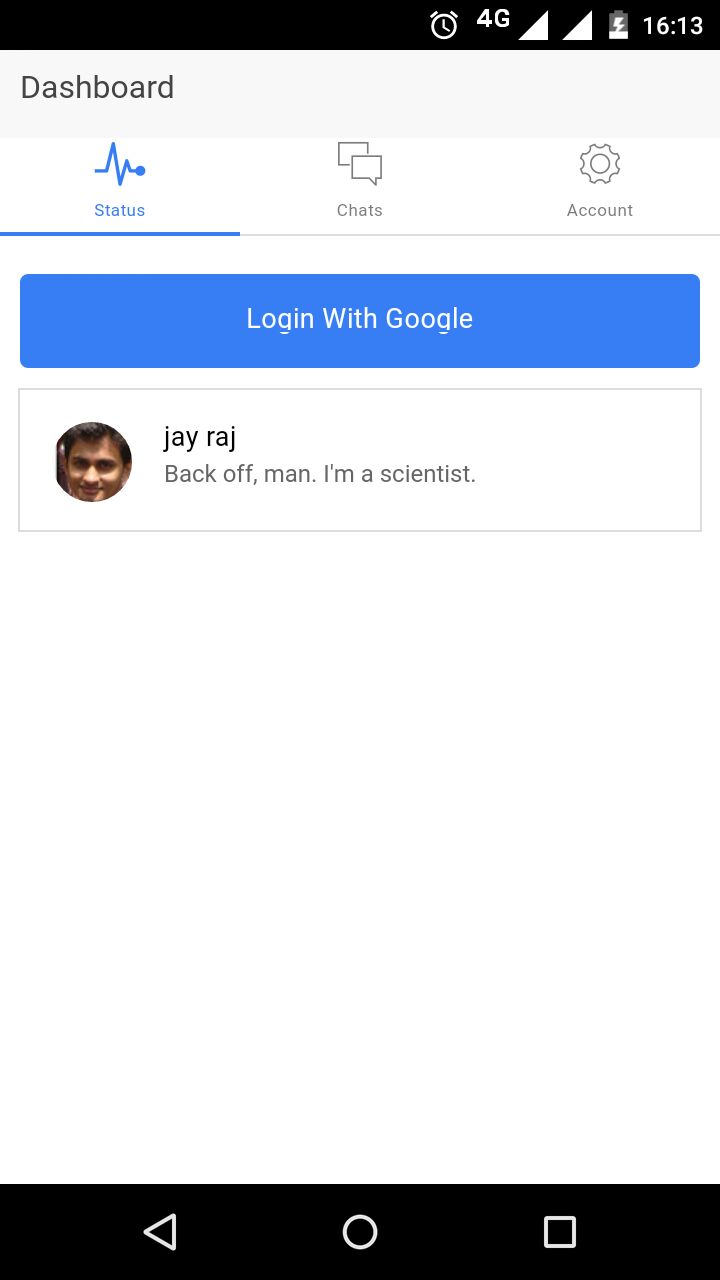
Save the changes, build the ionic app and deploy the .apk file to the device. Run the app and click to login using Google account. On a successful login you should be able to see the access token displayed on the app screen.
Pulling User Info With Access Token
Using the access token, extract the user info and display it in the app. Inside the googleLogin function, make an http call to the Google APIs to get the user information.
$http.get("https://www.googleapis.com/plus/v1/people/me", {
        params: {
            access_token: result.access_token
        }
    })
.then(function(res) {
    // success callback
}, function(error) {
    alert("Error: " + error);
});
In the success callback function, bind the user info to a scope variable and display it in the app.
$scope.details = res.data;
Now change the user interface by adding a class to the existing button.
<div>
  <a href="" ng-click="googleLogin()"><button class="button button-block button-positive">Login With Google</button></a>
</div>
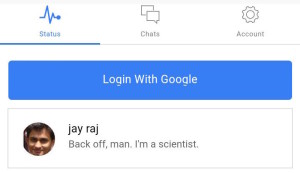
To display the user information, add a list as shown below:
<div ng-show="showProfile" class="list">
  <a class="item item-avatar" href="#">
    <img ng-src="{{details.image.url}}">
    <h2>{{details.displayName}}</h2>
    <p>Back off, man. I'm a scientist.</p>
  </a>
</div>
You added the showProfile scope variable to hide the list when the app loads, set the showProfile variable to true when the googleLogin method fetches the user info.
$scope.showProfile = true;
Here is the complete googleLogin method:
$scope.googleLogin = function(){

  $cordovaOauth.google("YOUR GOOGLE CLIENT ID", ["email","profile"]).then(function(result) {

      $scope.showProfile = false;
      $http.get("https://www.googleapis.com/plus/v1/people/me", {params: {access_token: result.access_token }})
      .then(function(res) {

       $scope.showProfile = true;
       $scope.details = res.data;

      }, function(error) {
          alert("Error: " + error);
      });

  },function(error) {
        // error
        $scope.details = 'got error';
    });
}
Save the changes, build the ionic app and run it. Try to login by clicking on the Login With Google button and on successful authentication user info should display in the app.
Do more with ngCordova plugins
In this tutorial you learnt how to add OAuth authentication to a Cordova and Ionic based app using the ngCordova plugin, cordovaOauth. If you’re interested in learning more about other plugins that may help your development, I recommend reading the ngCordova official documentation.
Please let me know your comments and questions below.
Frequently Asked Questions (FAQs) on Authenticating Users via OAuth with Cordova and Ionic
How do I set up OAuth with Cordova and Ionic?
Setting up OAuth with Cordova and Ionic involves a few steps. First, you need to install the Cordova and Ionic frameworks on your system. Once installed, you can create a new Ionic project and add the necessary platforms (iOS, Android, etc.). Next, you need to install the Cordova OAuth plugin, which will allow your application to authenticate with various OAuth providers. Finally, you need to configure your OAuth provider (Google, Facebook, etc.) to work with your application. This involves creating an application on the provider’s website, obtaining the necessary credentials (client ID, client secret), and configuring the redirect URI to point to your application.
What is the role of Firebase in OAuth authentication with Cordova and Ionic?
Firebase is a platform developed by Google that provides various services for mobile and web applications, including authentication. When using OAuth with Cordova and Ionic, Firebase can act as the backend service that handles the authentication process. This means that instead of implementing the OAuth flow manually, you can use Firebase’s built-in functionality, which simplifies the process and provides additional features such as user management, password recovery, and more.
How do I handle errors during the OAuth authentication process?
Handling errors during the OAuth authentication process is crucial to ensure a smooth user experience. Errors can occur for various reasons, such as network issues, incorrect credentials, or problems with the OAuth provider. When an error occurs, the Cordova OAuth plugin will return an error object that contains information about what went wrong. You can use this information to display an appropriate error message to the user or to take corrective action.
Can I use multiple OAuth providers with Cordova and Ionic?
Yes, you can use multiple OAuth providers with Cordova and Ionic. The Cordova OAuth plugin supports a variety of providers, including Google, Facebook, Twitter, and more. To use multiple providers, you need to configure each provider separately and provide the necessary credentials. When authenticating, the user can then choose which provider they want to use.
How do I secure my OAuth credentials in a Cordova and Ionic application?
Securing your OAuth credentials is crucial to prevent unauthorized access to your application. One common approach is to store the credentials on a secure server and retrieve them when needed. This way, the credentials are not exposed in your application code. Additionally, you should always use HTTPS when communicating with the OAuth provider to prevent eavesdropping.
How do I refresh OAuth tokens with Cordova and Ionic?
OAuth tokens typically have an expiration time, after which they become invalid. To continue using the OAuth service, you need to refresh the token. The Cordova OAuth plugin provides a refresh method that you can use to obtain a new token. You should call this method before the token expires to ensure uninterrupted service.
How do I log out a user from an OAuth session in Cordova and Ionic?
Logging out a user from an OAuth session involves invalidating the current OAuth token. The Cordova OAuth plugin provides a logout method that you can use to invalidate the token. Once the token is invalidated, the user will need to authenticate again to use the OAuth service.
Can I use OAuth with Cordova and Ionic for desktop applications?
While Cordova and Ionic are primarily used for mobile applications, you can also use them for desktop applications. However, the process may be slightly different, and not all OAuth providers may support desktop applications. You should check the documentation of your chosen OAuth provider for more information.
How do I test my Cordova and Ionic application’s OAuth functionality?
Testing your application’s OAuth functionality involves simulating the authentication process and verifying that it works as expected. You can use various tools and frameworks for this, such as Jest or Jasmine. Additionally, you should test the application with different OAuth providers and under different network conditions to ensure robustness.
How do I handle user data obtained from OAuth providers in Cordova and Ionic?
When a user authenticates with an OAuth provider, you typically receive some user data, such as the user’s name, email, and profile picture. How you handle this data depends on your application’s requirements. You might store the data in a database, display it in the application, or use it for other purposes. However, you should always respect the user’s privacy and comply with all relevant laws and regulations.
 Jay Raj
Jay is a Software Engineer and Writer. He blogs occasionally at Code Handbook and Tech Illumination.