Converting your iOS App to Android Using Kotlin
In this tutorial, you’ll see first-hand how similar these languages are and how simple it is to convert Swift to Kotlin by porting an iOS app to Android. By Lisa Luo.
Mobile devices are your everyday companions: You bring them in your backpack and pockets nearly everywhere you go. Technology continues to tailor to your mobile devices, making mobile development increasingly more prevalent as a hobby and profession.
Often, a developer will choose one platform for which to develop, the most common being Android or iOS. This choice is often guided by one’s resources (e.g., her or his personal device) or circumstance. Many developers tend to stick to building exclusively for their one chosen platform. Android and iOS engineers have historically worked with quite different languages and IDEs, making crossover between developing for both platforms daunting and rare, despite all the similarities between the two mobile platforms.
But languages and tooling for Android and iOS development have improved immensely over just the past few years — primarily the emergence of Kotlin and Swift, two expressive languages that have eased the barrier between cross-platform learning. After mastering the language fundamentals, code can easily be translated from Swift to Kotlin.

In this tutorial, you’ll see first-hand how similar these languages are and how simple it is to translate Swift to Kotlin. First, using Xcode, you will explore an iOS app written in Swift, then you will re-write the same app in Kotlin using Android Studio.
Note: Some familiarity of Swift and iOS fundamentals or Kotlin and Android fundamentals is helpful for completing this tutorial. You can catch up on Swift for iOS in these tutorials or Kotlin on Android here.
Getting Started
Download the starter projects for this tutorial using the Download materials button at the top or bottom of this tutorial.
iOS App Architecture
Open the iOS sample app final project in Xcode and run it in the iPhone simulator. The app will prompt you to log in. Log in to the app using any username and a password that is at least six characters long. The password should contain at least one numeric character.

Logging in to the app via username and password brings you to the main attraction: the bear! Give it a poke a few times to see what happens… but be careful. :]

Now, you’ll focus on the two ViewControllers for the architecture of this simple app, one for each of your interactive screens.
-
LoginViewControllerand BearViewController
Locate these controllers in the project. The app launches the LoginViewController first, which holds the TextField and Button UI components defined in the Main.storyboard. Also, note that the LoginViewController contains two helper functions for validating the password, as well as two helper functions for displaying invalid password errors. These are two of the Swift functions that you’ll re-write in Kotlin.
The BearViewController also references UI components defined in the shared Main.storyboard. Often, in iOS development, each ViewController will have separate storyboard views. In this tutorial, you’ll focus on the ViewController logic components rather than the UI. In the BearViewController, you keep a reference to a variable called tapCount that updates every time you tap your pokeButton, triggering the different bear states.
Swift to Kotlin: Fundamentals
Now that you have a general overview of the app, take a technical detour and dive into some language specifics using playgrounds. For Swift, create a new Blank playground in Xcode using File ▸ New ▸ Playground… and then it’s time to write some code!


Variables and Optionals
In Swift there is a concept called optional values. An optional value either contains a value, or nil. Paste this code into your Swift playground:
var hello = "world"
hello = "ok"

let hey = "world"
hey = "no"
Swift uses var and let to define variables, two prefixes that define mutability. You can only define variables declared with let once, which is why you see the compiler error, whereas var variables can change during runtime.

Add type signatures to your code in the playground, so that it now looks like this:
var hello: String? = "world"
hello = "ok"

let hey: String = "world"
hey = "no"
By adding these type signatures to the two variables, you’ve made hello a nullable String, signified by the ? in String?, while hey is a non-null String. Nullable variables are called Optional in Swift.
Why is this detail important? Null values often cause pesky crashes in apps, especially when your source of data isn’t always defined within the client (e.g., if you are expecting a value from the server, and it doesn’t come back). Having simple prefixes such as let and var allow you to have a built-in, on-the-fly check that prevents the program from compiling when the values can be null. See this related tutorial about functional programming in Swift for more information.
But what about Android? Nullability is often cited as one of the biggest pain points of Android development in Java. NPEs — or Null Pointer Exceptions — are frequently the cause of program crashes due to the poor handling of null values. In Java, the best you can do is to use the @NonNull or @Nullable support annotations to warn of nullable values. However, these warnings don’t prevent you from compiling and shipping your apps. Fortunately, Kotlin is here to save the day! See this introduction to Kotlin for more information.
Open up the Kotlin playground at try.kotlinlang.org and paste the lines of code that you just wrote in the Swift playground to replace the body of the main function:
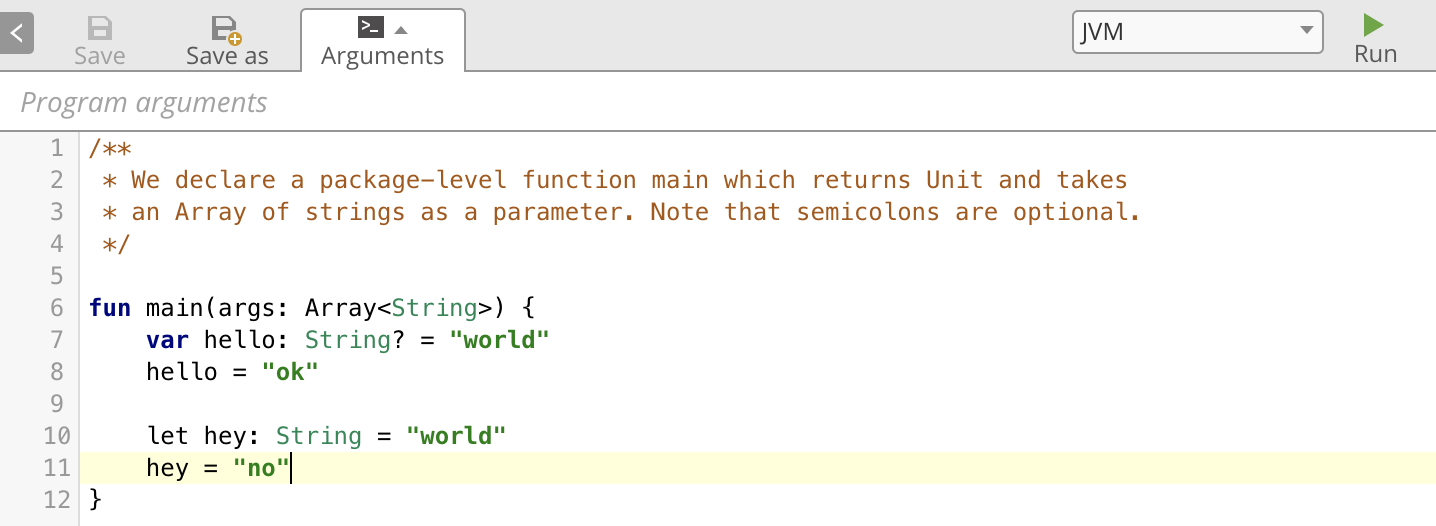
Amazing, right? You can copy code from one playground to another, even though the playgrounds use different languages. Of course, the syntax isn’t exactly the same. Kotlin uses val instead of let, so now change that modifier to the Kotlin way of declaring an immutable variable, like so:
fun main(args: Array<String>) {
  var hello: String? = "world"
  hello = "ok"

  val hey: String = "world"
  hey = "no"
}
Now that you changed let to val, you have Kotlin code!
Click Run in the top right corner and you’ll see the meaningful error:
![]()
This is saying the same thing you saw in the Swift playground. Just like let, you cannot reassign val.