


TL;DR: Best practices are simply professional standards that are acceptable in a field. Here, we will look at such practices as it relates to Android development.
Introduction
The Android platform runs the mobile market right now. During the Google IO in May 2017, Google announced that there were 2 billion monthly active Android devices. This is about 74% of the mobile operating system market share according to StatCounter as at February 2018. This is one of the major reasons for the large emergence of Android developers in recent times. As a result of the large patronage of the mobile platform, the manner in which we build mobile solutions also matter a great deal. If you are building for billions of users, we have to grow above just building just for the functionalities. we have to consider other factors such as scalability, better user experience, etc.
Recently, there has been lots of promise in Android development since the formal introduction of Kotlin. In May 2017, still during the Google IO, Google announced its support for the language. Kotlin is a statically typed programming language that runs on the Java virtual machine. It is statically typed because the datatype of the variables is known at compile time. The language comes with lots of new features:
- Null safety.
- Smart inference.
- Interoperability with Java.
- It can be compiled to JVM bytecode or JavaScript.
Kotlin helps us to write code twice as faster as we would with Java. Android has even released a set of extension functions to make coding on Android even more concise. The language has been in development since 2010 and the current version at the time of writing this article is v1.2.30.
In this article, we will look at some best practices in Android development to help us build better apps. We will also make use of Kotlin for the snippets. Let’s jump into them right away!
Design Patterns
Design patterns are general, reusable solutions to commonly occurring problems within a given context in software design. It is more like a template towards a solution. Apart from just being a potential solution to a problem, it helps communication among developers as it becomes easier to work in teams when you all are familiar with agreed patterns to follow. Design patterns didn’t just jump out of the bag, they existed since. According to Javamann on StackOverflow: "We used design patterns in the 80's, we just didn't know they were design patterns."
Some patterns practiced while developing Android apps include dependency injection, the singleton pattern, the separation of concerns pattern among others. We will briefly look at two of them.
Dependency Injection
Dependency injection (DI) is a concept where an object does not need to configure its own dependencies (objects). Instead, dependencies are passed in by another object. DI suggests that objects be initialized somewhere else and given to the requesting object. There are various forms of injections:
- Constructor injection - where the dependencies are passed through the constructor.
- Field injection - where dependencies are sent to the class fields directly, etc.
The last one is quite difficult to implement by self, and so, the use of a DI library Dagger2 is advised. Below is a quick snippet to showing an instance of dependency injection:
class MainActivitySample(private var mainRepo:MainActivityRepo) {
    fun performFun(){
      mainRepo.fetchData()
    }
}
Here, this class MainActivitySample has a dependency MainActivityRepo and it is not responsible for initializing it. Rather the object is being initialized elsewhere and served to the class through the constructor. This is an example of constructor injection. DI, in the long run, helps us to create lightly-coupled and testable apps. This is because, if an object changes, say MainActivityRepo changes, it is easier to reconfigure the object from a single source rather than go to all the classes using it to do so.
Separation of Concerns (SoC)
This is a pattern which encourages decoupling of your code into distinct units with well-defined responsibilities. In a platform like Android where there are components like activities, fragments, services, content providers and broadcast receivers being controlled by the Android OS, neglecting this has repercussions on the apps we build. This is where architectural patterns come in. Architectural patterns can help separate our data presentation from data processing. There are various architectural patterns that exist, such as Model View ViewModel (MVVM), Model View Presenter (MVP), etc.
We will take a brief look at the MVP architecture. This architecture is made up of three distinct parts:
- The View: this is the part that displays content to the user such as a progress bar, dialogs, etc.
- The Model: this is responsible for providing data to the app whether from the DB or a web-service. This should be your single source of truth (data).
- The Presenter: this part handles the business logic, like calling the Model to get data, and then updates the view.
In this architecture, it is recommended that the Presenter should not depend on any Android SDK.
A typical MVP flow works like this:
Your app starts off by showing a progress dialog. It is the responsibility of the View to do this. While showing the dialog, it needs to display data on the UI, so it informs the Presenter. The Presenter calls the Model and after data is gotten, it is returned to the Presenter who in turn returns the data to the View.
While using an architecture, be sure to maintain that structure throughout the app. When you successfully separate your code like this, it becomes easy to maintain, ship new features, and to test. The Android docs provide an in-depth tutorial on a guide to proper architecture using the architecture components. Here is another guide that gives you a good overview of design patterns in Android.
User Experience
User experience in this context refers to the satisfaction of a user’s interaction with your app. We will all agree that recently, there has been an increase in demand for better experiences on mobile. Here are some things to note in improving the experience of our apps:
Excellent UI
A lovely feel and experience of an app starts with a good design. Be sure to get one that matches the Google material design principles. Some of these principles include:
- Providing an Up navigation button.
- Consistency in color combinations.
- Use of proper icons to portray functionality, etc.
Handling Configuration Changes
Configuration changes seem to be a pain in the flesh of most Android developers. When you rotate your device and the screen changes orientation, Android usually destroys your application’s existing Activities and Fragments and recreates them. This is done so that the application can reload resources based on the new configuration and this is basically like starting afresh. Improper handling of this scenario is an instance of bad user experience. This could make you loose out on a whole lot of users.
One solution to this is not far off. With the ViewModel as part of the architecture components released by Google in 2017, you can be comfortable about the orientation change of your app without losing data in it. The ViewModel is designed to store and manage UI-related data in a lifecycle conscious way. With it, your data can survive configuration changes. To use it, you require dependencies:
Add this to your project build.gradle file:
allprojects {
    repositories {
        jcenter()
        google()
    }
}
And this to your app build.gradle file:
groovy
implementation "android.arch.lifecycle:viewmodel:1.1.0"
annotationProcessor "android.arch.lifecycle:compiler:1.1.0"
Thereafter, create a class that extends ViewModel:
class MoviesViewModel : ViewModel() {

    private val moviesRepository: MoviesRepository

    val popularMoviesLiveData: LiveData<MoviesResponse>
        get() = moviesRepository.RxGetPopularMovies()

    init {
        this.moviesRepository = MoviesRepository()
    }

}
And then you can connect it to your data sources to fetch data. Below, is an image that shows the lifecycle of an Activity as compared to that of a ViewModel.

ViewModels don’t persist data. They hold temporary data that survives when your phone is rotated.
Another solution to consider is persisting your data in the database after it has been fetched from a remote source so that when the phone is rotated, data can quickly be gotten from the DB instead of having to fetch again.
Respect the UI thread
Another bad user experience is in irregular freezing of an app. Irregular in the sense that it is, as a result, one carelessness or the other. This could be as a result of performing tasks on the wrong thread. This brings us to one of my favorite phrases - “Respect the UI Thread”. Operations that take a long time to finish usually freeze our app and as such need to be handled outside of the main thread. A typical example of a background task is a database operation. A snippet for handling this in the background can be this:
Executors.newSingleThreadExecutor().execute {
    // long running tasks
}
This snippet sets aside one thread to perform the operation in the background. If you use RxJava, you can equally take advantage of the schedulers that come with the library like this:
api.getData()
   .observeOn(AndroidSchedulers.mainThread())
   .subscribeOn(Schedulers.computation())
In the snippet above, the subscription is done on another thread while the result is being observed in the main thread. If the long-running tasks will live after you close your app, you should consider using a service, particularly an IntentService. This service naturally runs on the background thread and handles tasks in form of Intents. Below is an example of an IntentService:
class SampleIntentService : IntentService("SampleIntentService") {
    override fun onHandleIntent(intent: Intent?) {
        if (intent != null) {
            // handle the long process
        }
    }
}
"Respect the UI thread! Always move your long running tasks to the background thread."
Tweet This

Compatibility
In Android, the word compatibility points to two options: app and device compatibility. As Android developers, we just have to worry about the first - app compatibility. Talking about device compatibility, only devices that are Android compatible include Google Play Store which in turn accepts our app. So as app developers, we have no role to play here at least for now.
Create alternative resources
This aspect focuses on a UI that scales (i.e a UI that adapts irrespective of device screen). There are many devices with different screen sizes and densities. Depending on our target market, we should make adequate provision for a variety of resources (images & layouts), thereby, giving our app the much-needed flexibility. No one would be happy to download an app that is skewed on his/her device. There are principles to be applied to achieve this feat.
Android provides a framework in which we can provide configuration-specific app resources such as different XML layouts for different screen sizes. Android then loads the appropriate resources based on the current device configuration.
If you have intentions of supporting a tablet, you should consider creating an alternative layout. You can create alternative layouts by right-clicking on any folder in the directory → New → Android resource file. In our own case here, we chose the smallest width qualifier and set the smallest screen width to 600dp.
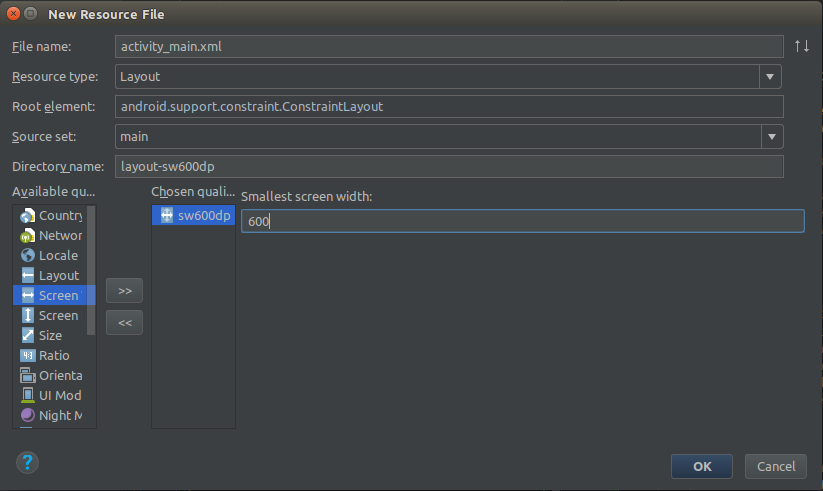
This means that only screens with a minimum width of 600dp can use this alternative layout. This layout is definitely for tablets. You can create layouts based on heights, orientation, and general sizes. Creating alternative layouts can be minimized if you use a very flexible layout as ConstraintLayout, and you reduce hard coding of view sizes. When assigning a width and height to a view, using a direct size, say 20dp might have a negative design effect on contrasting devices. Remember the device you use for preview is not the only device that exists! You should instead opt for wrap_content or match_parent when assigning the widths and heights of views. This is because these two properties automatically adapt to your device size - wrap_content takes the size of the view while match_parent takes the size of the layout housing the view.
Just as we create alternative layouts, we also need to create alternative drawable (image) files if you are going for the traditional .png or .jpg files. But using vector drawables are recommended because of scalability. To use them, make sure there are enabled in your app build.gradle file:
android {
    compileSdkVersion 27
    defaultConfig {
        vectorDrawables.useSupportLibrary = true
        // other configs
    }
}
Then, you store your vector file usually ending with .xml in the drawables folder and assign it to an image using:
<ImageView
    android:layout_width="wrap_content"
    android:layout_height="wrap_content"
    app:srcCompat="@drawable/default_avatar" />
Prepare for multi-language support
Another aspect you should take note of is potential support for multiple languages. To achieve this, you have to store all your strings in the strings.xml file. This gives room for easy translation at any point in time. Even if you don’t plan to support other languages, storing all strings in the strings.xml file is a standard practice.
Security & Privacy
Security could easily be one of the most neglected areas when building apps because it is large in scope and seen by many as impossible to perfect. Google, as usual, has acted quickly to release features that significantly reduce the frequency of security issues. Some of which include:
- Google play protect: this is built into every device with Google Play to automatically take action to keep data and device safe.
- SafetyNet attestation: evaluate if it is a certified secure Android device.
- reCAPTCHA for Android: to ensure an app is not automated i.e handled by a robot.
- Encryption from Android M to protect user data, etc.
However, some security vulnerabilities are outside their control at least at the moment. There is still some work to be done.
Communicate Securely with a Server
Most times, our apps need to communicate with APIs and backend services to fetch data or send data. This should be done in a secure manner. For this reason, The network security configuration was introduced to ensure adequate validation of the servers our apps intend to communicate with.
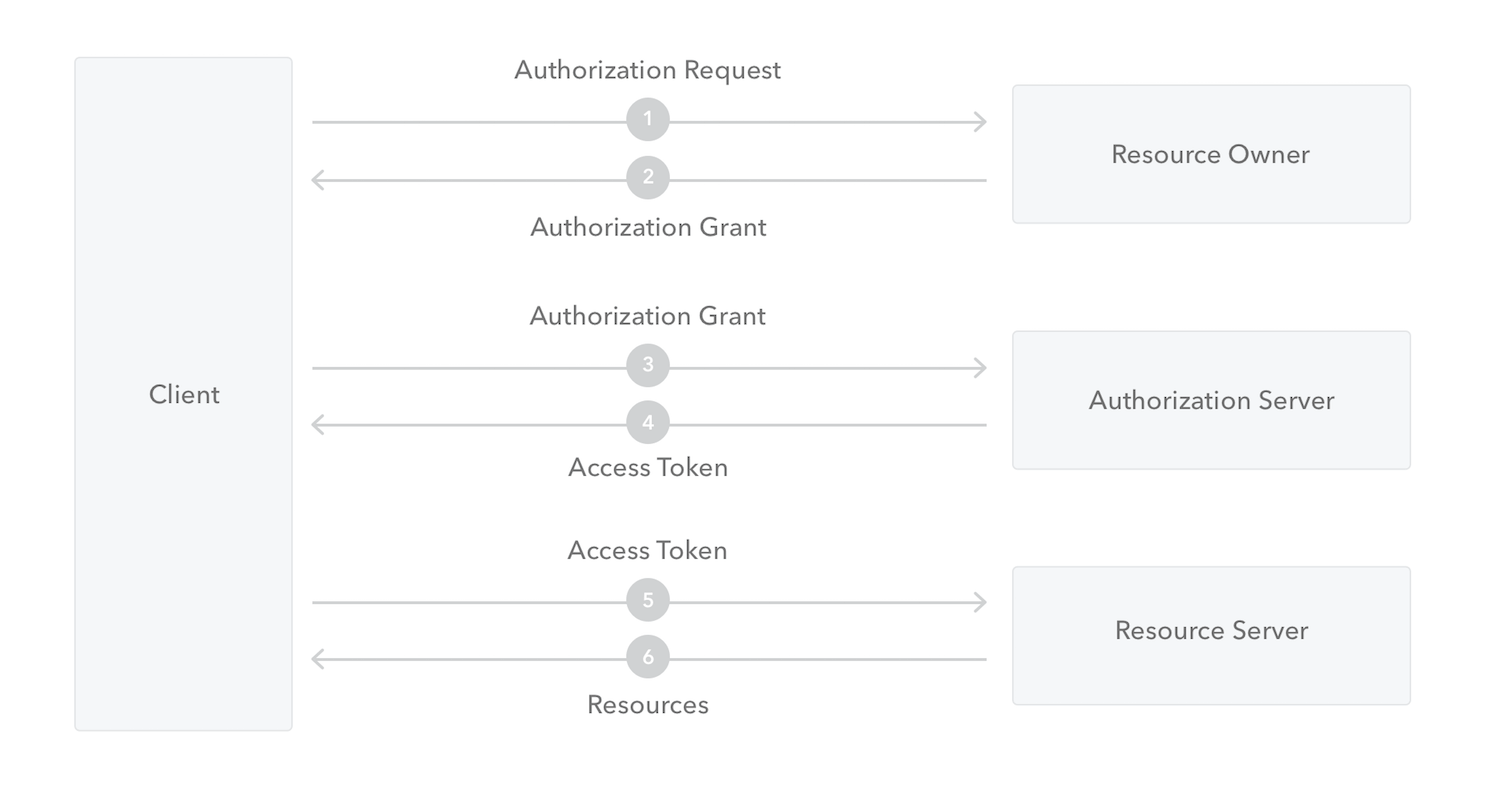
When we talk about secure backend services, we won't go too far because have such services readily available at your beck and call, thanks to Auth0. Auth0 is a company that provides identity management solutions for our apps. If you are building a social app or anything related that requires authentication and user management, you could use the service provided to us by Auth0 to manage our identities while you focus on other functionalities. Auth0 makes use of secure protocols such as OAuth2.0. The OAuth2.0 protocol is used for mainly authorization. It is a protocol that gives a user access to resources on a server without exposing the identity. Below is a generic workflow of the protocol.
Some other protocols used by Auth0 include - OpenID Connect, SAML, WS-Federation, LDAP.
Some other reasons you should use Auth0 include:
- Multiple social identity providers: using a social provider such as Facebook to authenticate users.
- Single sign-on (SSO): making a user login just once yet get access to other applications that use same authentication system. Google's implementation of login for their products, such as Gmail, YouTube, etc, is an example of SSO.
- Multifactor authentication: verifying a user's identity by requiring them to present more than one piece of identifying information. This is used in Gmail.
- Passwordless authentication: authenticate users using a unique link or using a code sent to their phones or email. A common example of this authentication system is in WhatsApp.
- Enterprise identity providers (Active Directory, LDAP, SAML, custom, etc.).
Integrating this service is quite easy. First, create a new Android project by following the usual wizard. You can download a stable version of Android studio here. Go ahead to add the Auth0 library in your app build.gradle file:
implementation 'com.auth0.android:auth0:1.12.0'This is the latest Android Lock library released recently with some bug fixes. Usually, the library needs to connect to another server and so we need the internet permission. Go to your AndroidManifest.xml file and add it like so:
<manifest xmlns:android="http://schemas.android.com/apk/res/android"
    package="com.auth0.samples">

    <uses-permission android:name="android.permission.INTERNET"/>

    // ...
</manifest>
Next, you create an account at Auth0.com. It is free and easy to setup. When you get to your dashboard, create a new application by clicking the Create Application button. Insert a name for the application and choose native as its type. Here is how a newly created application looks
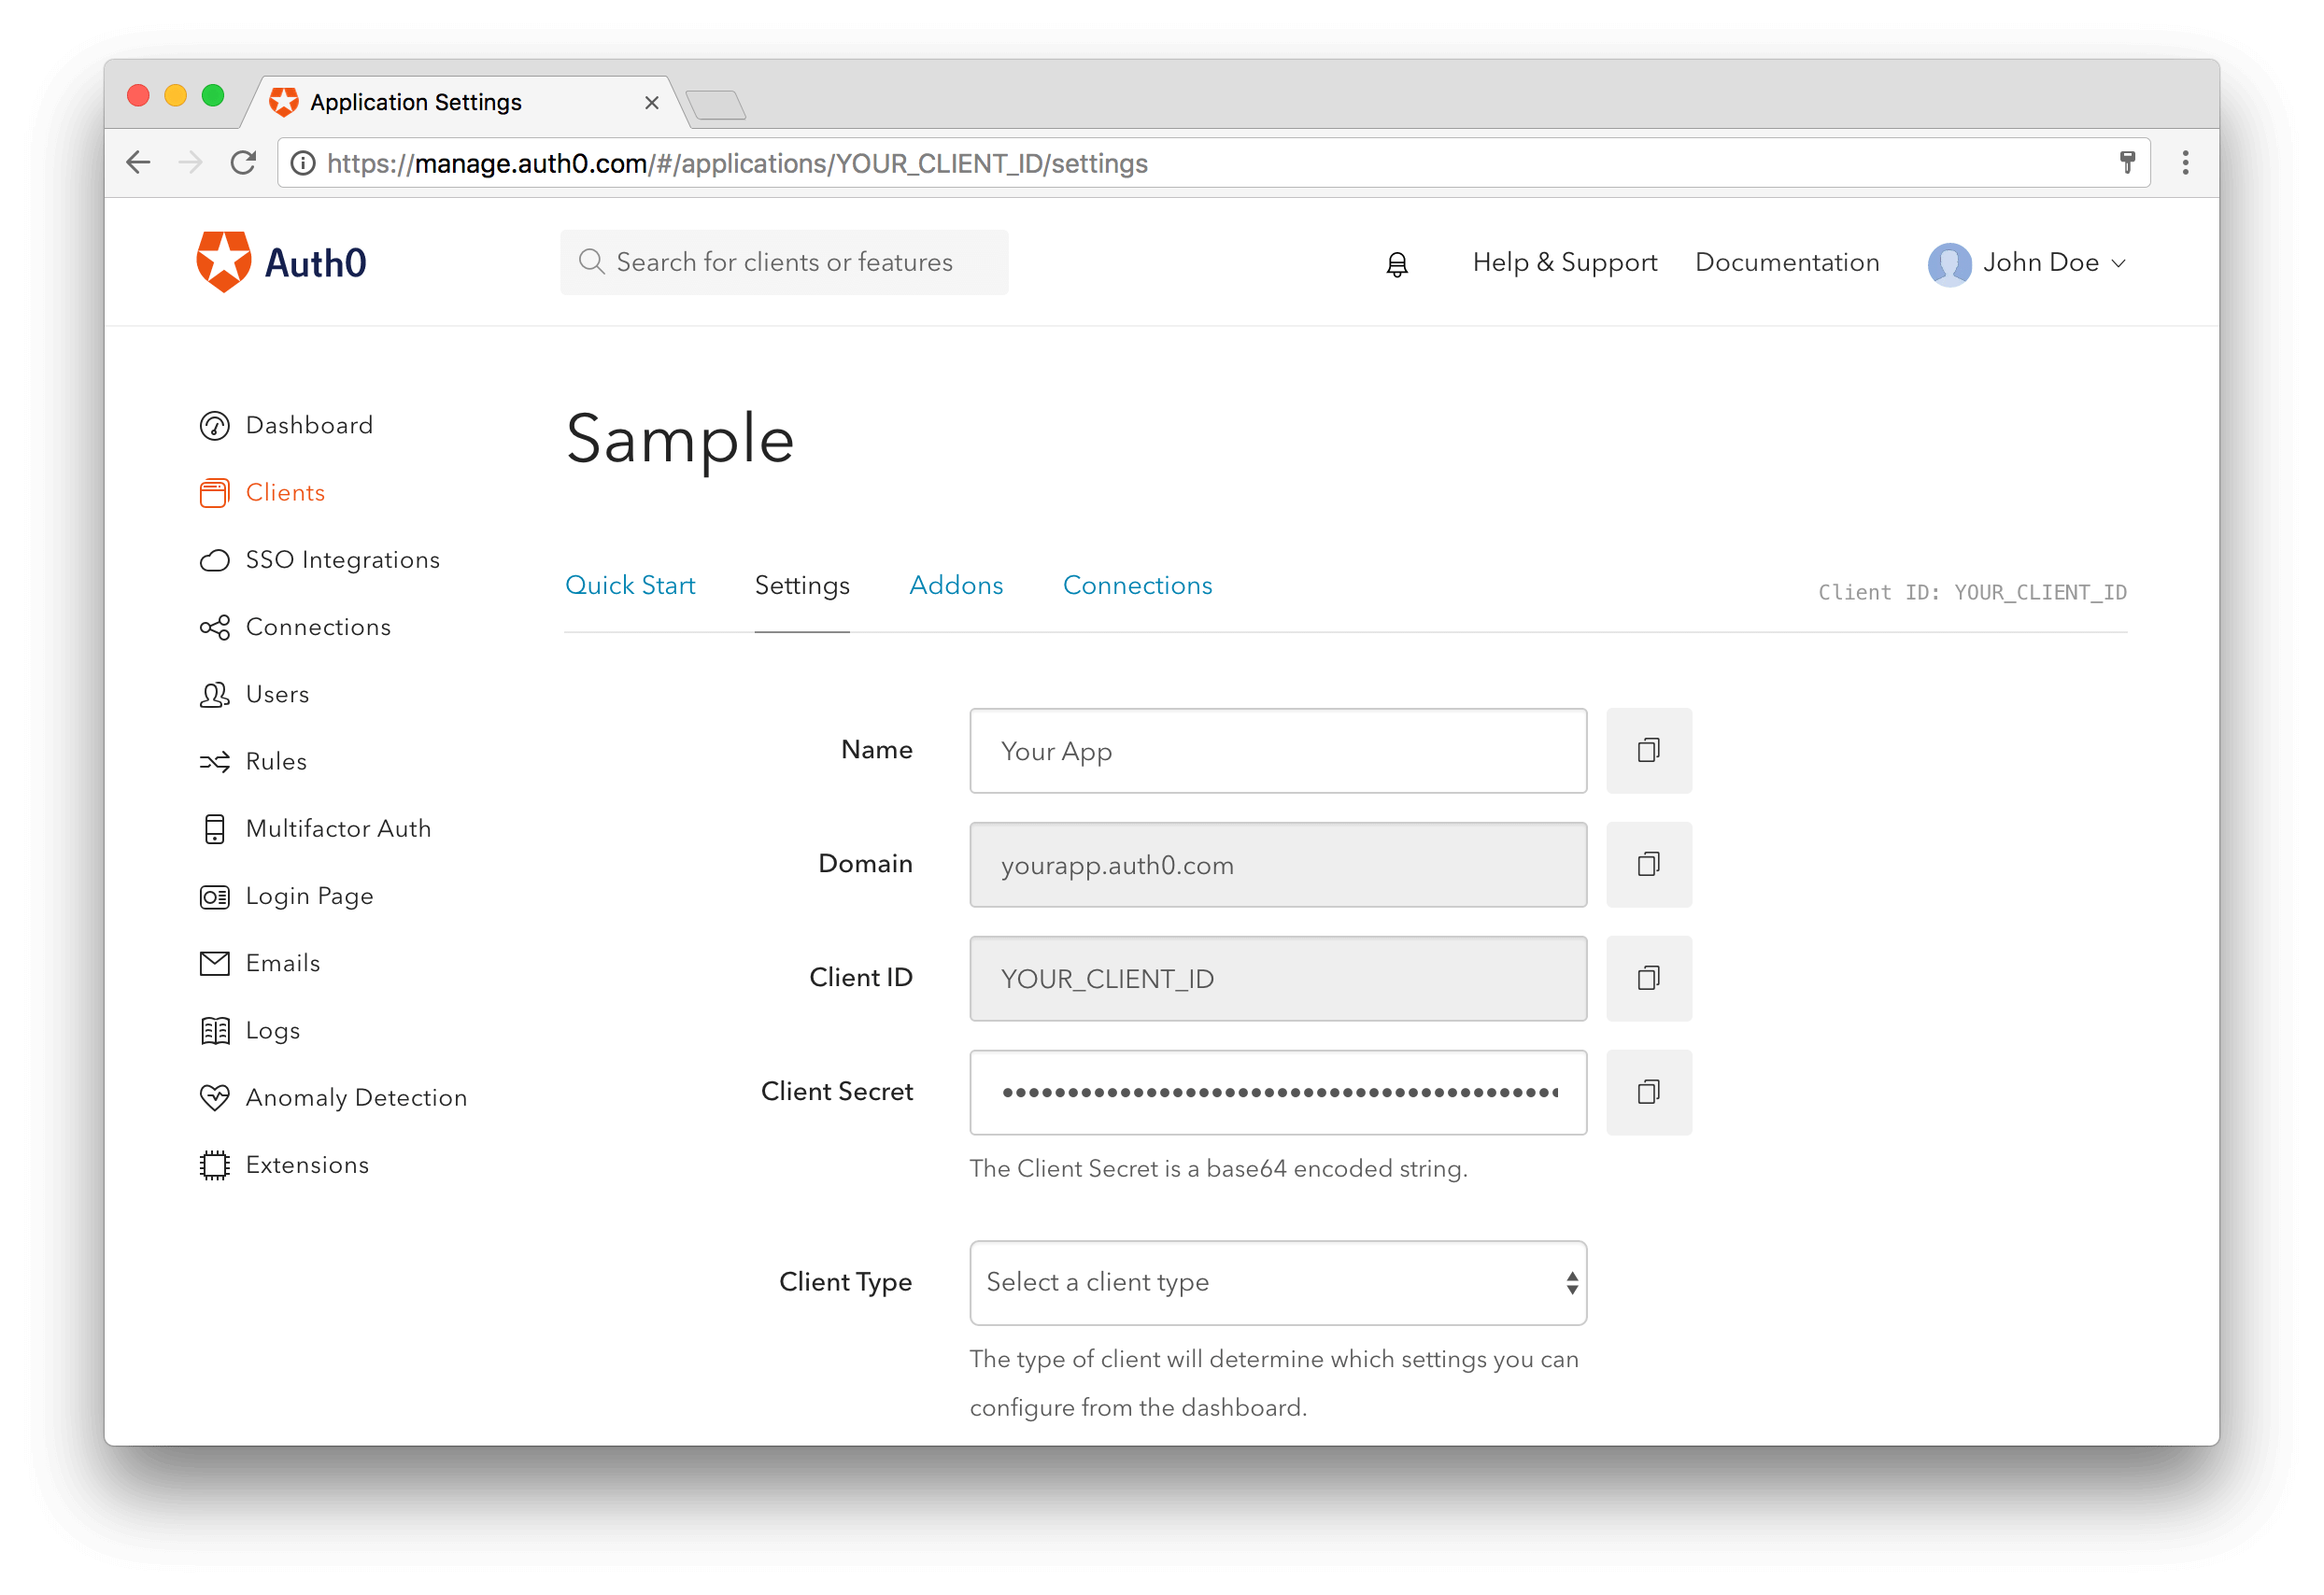
After this, we need to configure our callbacks. Go to the settings tab of your newly created application and add the URL:
demo://YOUR_AUTH0_DOMAIN/android/YOUR_APP_PACKAGE_NAME/callbackThis is a sample callback URL which contains:
- The scheme: since this is a demo, you can opt for the
demoagainst thehttpsandhttp. - Our Auth0 domain name: usually something like
xxx.auth0.com - The android directory -
/android - Our app package name: you can get this from your
AndroidManifest.xmlfile. - And the callback directory -
/callback
Next, we copy the credentials of your Auth0 application to strings.xml resource file in your Android project like this:
<resources>
    <string name="com_auth0_client_id">CLIENT_ID</string>
    <string name="com_auth0_domain">xxx.auth0.com</string>
</resources>
You should replace these details with your own unique domain name and client ID.
You also have to configure your manifest holders with the domain details. Open your app build.gradle file and add this:
defaultConfig {
    applicationId "com.auth0.samples"
    minSdkVersion 19
    targetSdkVersion 27
    //...

    //---> Add the next line
    manifestPlaceholders = [auth0Domain: "@string/com_auth0_domain", auth0Scheme: "demo"]
    //<---
}
Notice that we still maintained the same scheme - demo as we used in the callback URL. For Android, Auth0 offers both the browser-based and native logins. The browser login is highly recommended and you can see why that is so here. For this sample, we will use the browser-based login. We then begin our authentication like this:
val auth0 = Auth0(this)
auth0.isOIDCConformant = true
WebAuthProvider.init(auth0)
    .withScheme("demo")
    .withAudience(String.format("https://%s/userinfo", getString(R.string.com_auth0_domain)))
    .start(this@MainActivity, object : AuthCallback {
        override fun onFailure(dialog: Dialog) {
            // Show error Dialog to user
        }
        override fun onFailure(exception: AuthenticationException) {
            // Show error to user
        }
        override fun onSuccess(credentials: Credentials) {
            // Store credentials
            // Navigate to your main activity
        }
    })
Here we initialized the Auth0 object with the app context. This is because we have already provided the details in the AndroidManifest.xml file. We also set it to be ODI comformant. And we used the same scheme as we used in our callback URL and manifest holders. The schemes should always match.
We have been able to integrate a secure backend service for our apps. You can go further than this to add more identity providers for your Auth0 application or even decide to go passwordless.
Permissions
Already, since the Marshmallow release, Android ensures adequate privacy by making sure that the app requests some permissions at the point of use - what we call run-time permissions. Similarly, accessing features without requesting the necessary permissions in the AndroidManifest.xml file results in a security exception. Your app should request only the minimum number of permissions necessary to function properly. Whenever possible, don't add a permission to your app to complete an action that could be completed in another app. Instead, use an intent to defer the request to a different app that already has the necessary permission.
Data Storage
Our apps always have the need to store data. Data is supposed to be stored in a secure manner such that other apps can’t access. It is advised to store sensitive data within the internal storage and not the external storage because the Android system doesn't enforce security restrictions on data that resides within external storage, and the storage medium itself isn't guaranteed to stay connected to the device. Also, if you have to use SharedPreferences in storing small amounts of data, use it in a private mode so that other apps cannot access, like this:
val pref = context.getSharedPreferences(PREF_KEY, Context.MODE_PRIVATE)The official Android docs provides other relevant practices app developers should take note of.
Performance
The smooth functionality of an app is the joy of its developer and I believe we are not exempted. Knowing full well that not just our app exists on a device, we should be able to equip our app for survival in the device (i.e not being uninstalled because of some funny behaviors). As app developers, we should be conversant with resource management in Android. From managing the memory allocated to the app, to ensuring optimal usage to avoid unnecessary exploitation of the device. To improve performance in our apps, we can utilize the following tips;
Manage Objects Properly
First, we should avoid creating unnecessary objects. According to the Android docs, if you don't need to access an object's fields (e.g accessing member variables of a class), you should make your method static because static invocations are about 15%-20% faster. Kotlin provides a concept of lazy initialization to prevent unnecessary initialization of objects as seen in this snippet:
private val mAdapter by lazy {
    ViewPagerAdapter()
}
This makes sure that the object is only initialized when it is about to be accessed and it makes sure only one instance of the object exists.
Still talking about objects, we should always release expensive objects. There are some objects we create that have direct access to our device resources. For instance, if you use ExoPlayer, a video library for Android. When you initialize a SimpleExoPlayer instance like this:
val player = ExoPlayerFactory.newSimpleInstance( DefaultRenderersFactory(this),
        DefaultTrackSelector(), DefaultLoadControl());
Resources like hardware codecs are used here. These resources are used by other apps as well. We need to release resources when there are no longer in use by our app in the appropriate lifecycle method - maybe onStop or onPause. Failure to release them could lead to memory leaks. Memory leaks have serious effects on your app such as freezing the app and eventually crashing the app due to an OutOfMemory (OOM) error. OOM errors are caused when there is a demand for lots memory that goes beyond the max heap memory limit of a process.
Loading multiple large bitmaps, keeping static references to activities, contexts, views, unregistering from broadcast receivers and listeners like are similar instances resulting in such errors. Square has an open source library called LeakCanary that helps us to track memory leaks in our app. You can use LeakCanary like this:
Add the dependencies to the app build.gradle file:
dependencies {
  debugImplementation 'com.squareup.leakcanary:leakcanary-android:1.5.4'
  releaseImplementation 'com.squareup.leakcanary:leakcanary-android-no-op:1.5.4'
}
Create an Application class:
class ExampleApplication : Application() {

    override fun onCreate() {
        super.onCreate()
        if (LeakCanary.isInAnalyzerProcess(this)) {
            // This process is dedicated to LeakCanary for heap analysis.
            // You should not init your app in this process.
            return
        }
        LeakCanary.install(this)
        // Normal app init code...
    }
}
With this, LeakCanary monitors your app and sends you a notification when there is a memory leak.
Layout Performance
Next thing in discussing our app performance concerns our layout performance. Deep nested layout are slow to draw on the UI, therefore, producing a lag in performance in our app. The layout performance of our app can be improved by flattening the layout— make the layout shallow and wide, rather than narrow and deep (deep-nested). This is where the ConstraintLayout comes in. The ConstraintLayout is a pretty new layout released in May 2017. It supports API 9 upwards. It allows you to create large and complex layouts with a flat view hierarchy (no nested view groups). It is a replacement for the relative layout.
A typical RelativeLayout looks like this:
<RelativeLayout>
  <LinearLayout>
      <ImageView/>
  </LinearLayout>
  <TextView>
  <LinearLayout>
      <Button/>
      <EditText/>
  </LinearLayout>
</RelativeLayout>
And a ConstraintLayout looks like this:
<android.support.constraint.ConstraintLayout>
  <ImageView/>
  <TextView/>
  <Button/>
  <EditText/>
</android.support.constraint.ConstraintLayout>
ConstraintLayout gives us a performance advantage because the layout is easier to draw, and therefore, it takes less time to display on the UI. Recently, in Android Studio, projects are created with the ConstraintLayout by default. You can get acquainted with this awesome layout using the official docs.
"ConstraintLayout helps us to create large complex layouts while improving the performance of our layout in the process."
Tweet This
Keep the Long Running Tasks Away
As stated earlier in this post, respect the UI thread. Use a background thread for all long running tasks. Doing this counts for a better performance and better user experience in the long run.
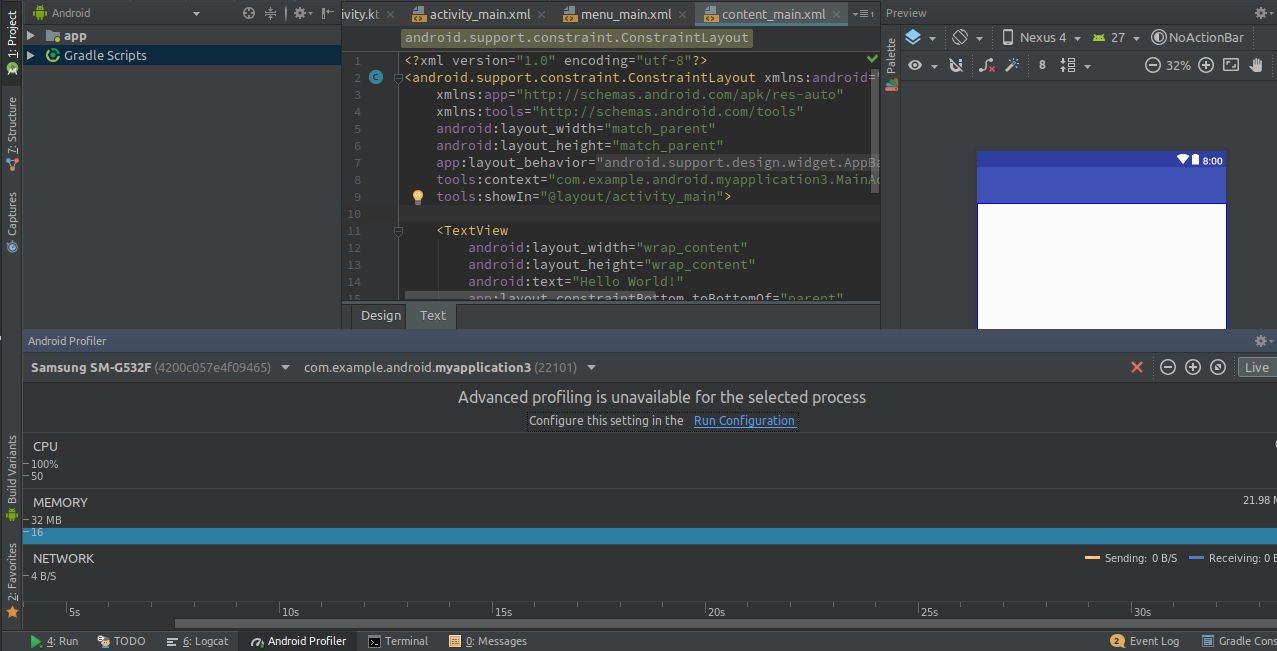
Finally, as an Android developer, evaluating performance should be a watchword. Android Studio provides us with the profiler to check the performance of our app while still in development. The profiler helps us gauge the device’s resource usage of our app during execution. It is usually located at the bottom of your screen and only shows up when the app is running.
Conclusion
These practices help us write clean and maintainable code. In this article, we have learned some areas in Android development where most developers tend to make major mistakes. We have equally learned how to address such from learning about the importance of design patterns, to improving performance, to supporting multiple devices, and even securing our apps. Notably, we learned how Auth0 can help us secure our apps. We went as far as integrating Auth0 into our app. Applying these practices we have learned go a long way to improve our app both in the user experience and in code maintenance.


