

For a lot of people, buying cryptocurrency – like Bitcoin, Litecoin, and Ethereum – is a long-term game. Day trading anything that volatile is a dangerous game, so the day to day price isn’t all that important. Most people will probably buy, hold, and wait to see if it pays off years down the road.
That doesn’t mean it isn’t fun to follow the markets day-to-day and see what’s happening, especially when price movements can be plus or minus 30% or more in a single day. Cryptocurrency has a lot of hype right now, and it’s exciting to see what is happening, and how much your portfolio is worth.
That is why over the weekend I decided to build a little Progressive Web Application called cryptoPWA with Ionic:
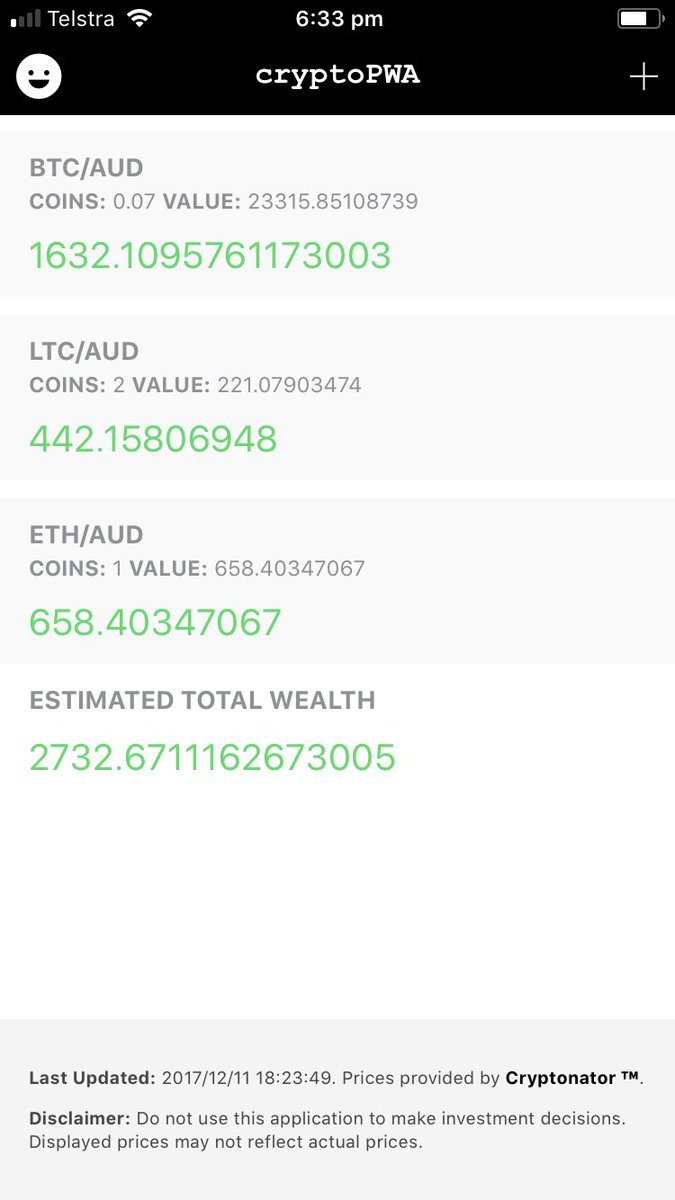
This was mostly for fun and building myself a tool that I wanted – a tool that would allow me to specify how much I hold of each cryptocurrency, and it would tell me approximately how much that is worth at any given moment. But this is also a very practical example of building a progressive web application with plenty of lessons to be learned.
In this tutorial series, we will be building a slightly simplified version of the cryptoPWA application with Ionic. We will cover building the application itself, adding what is necessary for it to function as a PWA, and hosting it using Firebase hosting.
There is going to be a mixed bag of lessons in this tutorial series, including the following:
- Basic CRUD and navigation
- Creating pull to refresh functionality
- Parallelising multiple HTTP requests for increased speed/performance
- Integrating with an external API
- Using local storage
- Creating custom types/interfaces
- PWA support
- Offline availability with service workers
- Error handling
We will be covering a lot of these concepts in this tutorial, and the rest of the concepts in the tutorials that follow this one. Since we will be covering a lot, we won’t be covering the concepts in a lot of depth. I will mostly just be talking through the code, and I will link off to further information whenever it is practical.
Part 2: Preparing a Progressive Web Application for Production
Part 3: Hosting a Progressive Web Application with Firebase Hosting
Before We Get Started
Last updated for Ionic 3.9.2
Before you go through this tutorial, you should have at least a basic understanding of Ionic concepts. You must also already have Ionic set up on your machine.
If you’re not familiar with Ionic already, I’d recommend reading my Ionic Beginners Guide or watching my beginners series first to get up and running and understand the basic concepts. If you want a much more detailed guide for learning Ionic, then take a look at Building Mobile Apps with Ionic.
1. Set up the Application
The first thing we are going to do is generate a new Ionic application, set up the pages and providers we need, and configure lazy loading.
Generate a new Ionic application with the following command:
ionic start cryptopwa blankWhen asked if you would like to integrate Cordova, you an say no (we’re building a PWA, baby!). Now let’s set up our pages and providers.
Run the following commands to generate the necessary page and provider:
ionic g page AddHoldingionic g provider HoldingsThe AddHolding page will allow us to add new cryptocurrency holdings, and the Holdings provider will handle all of the grunt work related to calculating the worth of the holdings.
Newly generated pages in an Ionic project will have lazy loading set up by default. However, we need to make sure that we also enable lazy loading for the home page and that we configure lazy loading to enable preloading.
Create a file at src/pages/home/home.module.ts and add the following:
import { NgModule } from '@angular/core';
import { IonicPageModule } from 'ionic-angular';
import { HomePage } from './home';

@NgModule({
  declarations: [HomePage],
  imports: [IonicPageModule.forChild(HomePage)],
})
export class HomePageModule {}
Modify src/app/app.module.ts to reflect the following:
import { BrowserModule } from '@angular/platform-browser';
import { ErrorHandler, NgModule } from '@angular/core';
import { IonicApp, IonicErrorHandler, IonicModule } from 'ionic-angular';
import { IonicStorageModule } from '@ionic/storage';
import { HttpClientModule } from '@angular/common/http';
import { SplashScreen } from '@ionic-native/splash-screen';
import { StatusBar } from '@ionic-native/status-bar';

import { MyApp } from './app.component';
import { HoldingsProvider } from '../providers/holdings/holdings';

@NgModule({
  declarations: [MyApp],
  imports: [
    BrowserModule,
    IonicModule.forRoot(MyApp, {
      preloadModules: true,
    }),
    IonicStorageModule.forRoot(),
    HttpClientModule,
  ],
  bootstrap: [IonicApp],
  entryComponents: [MyApp],
  providers: [
    StatusBar,
    SplashScreen,
    { provide: ErrorHandler, useClass: IonicErrorHandler },
    HoldingsProvider,
  ],
})
export class AppModule {}
In our imports we have added a configuration for lazy loading called preloadModules and set that to true. By default, lazy loaded pages will only be loaded in when they are accessed. This can be a good thing if you have a lot of pages, but it does cause a small delay the first time you load the page. Using preloadModules is usually the best of both worlds because you get the improved boot time of lazy loading, but after the application has loaded the additional components will begin loading in the background right away.
We have also included imports for IonicStorageModule and HttpClientModule because we will be using local storage for this application and we will be making HTTP requests.
Since we are lazy loading the home page now, we must now update any references from HomePage to 'HomePage', and we can also remove the HomePage imports.
Update src/app/app.component.ts to reflect the following:
import { Component } from '@angular/core';
import { Platform } from 'ionic-angular';

@Component({
  templateUrl: 'app.html',
})
export class MyApp {
  rootPage: any = 'HomePage';

  constructor(platform: Platform) {
    platform.ready().then(() => {});
  }
}
2. Create the Holdings Provider
The bulk of the heavy lifting in this application will be done in the Holdings provider. It will be response for adding and removing specific holdings, saving holdings and loading them from storage, verifying that a particular cryptocurrency exists, and fetching the prices from the Cryptonator API.
A common mistake is to include a lot of this grunt work in the pages themselves. Ideally, your pages should be as “dumb” as possible, and only contain code that is required to display stuff to the user. Pages should handle event bindings for the template, initialise variables, make calls to providers, but not much else. By separating our logic out into providers we can share that code across multiple pages so that we are not duplicating work, and we can remove a lot of bloat from our pages.
We are going to implement the entire provider at once, and then talk through the code.
Modify src/providers/holdings/holdings.ts to reflect the following:
import { HttpClient } from '@angular/common/http';
import { Injectable } from '@angular/core';
import { Storage } from '@ionic/storage';
import { Observable } from 'rxjs/Observable';
import { forkJoin } from 'rxjs/observable/forkJoin';

interface Holding {
    crypto: string,
    currency: string,
    amount: number,
    value?: number
}

@Injectable()
export class HoldingsProvider {

    public holdings: Holding[] = [];

    constructor(private http: HttpClient, private storage: Storage) {

    }

    addHolding(holding: Holding): void {

        this.holdings.push(holding);
        this.fetchPrices();
        this.saveHoldings();

    }

    removeHolding(holding): void {

        this.holdings.splice(this.holdings.indexOf(holding), 1);
        this.fetchPrices();
        this.saveHoldings();

    }

    saveHoldings(): void {
        this.storage.set('cryptoHoldings', this.holdings);
    }

    loadHoldings(): void {

        this.storage.get('cryptoHoldings').then(holdings => {

            if(holdings !== null){
                this.holdings = holdings;
                this.fetchPrices();
            }
        });

    }

    verifyHolding(holding): Observable<any> {
        return this.http.get('https://api.cryptonator.com/api/ticker/' + holding.crypto + '-' + holding.currency);
    }

    fetchPrices(refresher?): void {

        let requests = [];

        for(let holding of this.holdings){

            let request = this.http.get('https://api.cryptonator.com/api/ticker/' + holding.crypto + '-' + holding.currency);

            requests.push(request);

        }

        forkJoin(requests).subscribe(results => {

            results.forEach((result: any, index) => {

                this.holdings[index].value = result.ticker.price;

            });

            if(typeof(refresher) !== 'undefined'){
                refresher.complete();
            }

            this.saveHoldings();

        }, err => {

            if(typeof(refresher) !== 'undefined'){
                refresher.complete();
            }

        });

    }

}
We will be improving upon this in the next tutorial by adding better error handling, but for now we have the basic implementation completed.
We have created a custom interface which allows us to create our own custom type for the holdings. You will see that in this provider we specify the following type on one of the class members:
public holdings: Holding[] = [];This enforces that this.holdings will be an array filled with data of the type ‘Holding’. We defined this type as being an object that contains a crypto value that is a string, a currency value that is a string, an amount value that is a number, and an optional value that is a number. The role of each of these properties is defined below:
- crypto – the symbol for the cryptocurrency that is being added (i.e. BTC, ETH, or LTC)
- currency – the symbol for the currency that the values should be displayed in (i.e. USD, AUD, or even BTC)
- amount – the number of coins of this type that are being held
- value – the current value of the cryptocurrency fetched from the API
Enforcing this structure by creating a custom type through an interface has a couple of benefits. It will enforce that the data we add to the holdings array consists of the structure we defined, which will help catch potential bugs, and it will also allow us to reference the structure of the data in templates, i.e:
{
  {
    holdings.value;
  }
}
without having to worry about the compiler complaining. The first few methods in this provider are quite straight-forward. The role of these methods is to add and remove data from the holdings array, to save that data into storage, and to retrieve that data from storage. Then we have two methods that interact with the Cryptonator API:
verifyHolding(holding): Observable<any> {
        return this.http.get('https://api.cryptonator.com/api/ticker/' + holding.crypto + '-' + holding.currency);
    }
This API is super easy to use. All you need to do is add the symbol for the cryptocurrency and a symbol for the currency to display the values to the end of the URL. You can then just make a GET request to that URL, and it will return a JSON response with the current values.
If you are not familiar with how to fetch data from a server using HTTP like this, you might be interested in reading Loading Remote JSON Data with HTTP in Ionic and Using Http to Fetch Remote Data from a Server in Ionic .
The purpose of the verifyHolding method is to check whether or not a particular combination actually exists on Cryptonator before adding it. We can check the data that is returned for the success property, and if this is false we will know that it does not exist and that we should not allow it to be added. Let’s take a look at the next method:
fetchPrices(refresher?): void {

        let requests = [];

        for(let holding of this.holdings){

            let request = this.http.get('https://api.cryptonator.com/api/ticker/' + holding.crypto + '-' + holding.currency);

            requests.push(request);

        }

        forkJoin(requests).subscribe(results => {

            results.forEach((result: any, index) => {

                this.holdings[index].value = result.ticker.price;

            });

            if(typeof(refresher) !== 'undefined'){
                refresher.complete();
            }

            this.saveHoldings();

        }, err => {

            if(typeof(refresher) !== 'undefined'){
                refresher.complete();
            }

        });

    }
The issue with this application is that we need to make a separate request to the API for each cryptocurrency that is added. This means that we need to deal with the issue of running multiple HTTP requests and waiting for them all to finish. What we can do is run all of these requests in parallel, so that they all execute at the same time, and when they are finished they will trigger a single handler with all of the results.
To do this, we build an array of all the requests that we want to run (one for each holding), and then we use forkJoin to run all of those requests in parallel. Once we get the results, we loop through the holdings and update the value field with the ticker price.
We also have an optional parameter of refresher being passed into this method. We will be using Ionic’s pull to refresh component in one part of the application, and this allows us to notify the component that the request is finished and that it should hide the “refreshing” animation.
3. Implement the Home Page
We are going to implement the home page that will display all of the holdings along with their current values. We are also going to implement the “pull to refresh” component on this page, so that the user can just swipe down to update the values at any time.
Modify src/pages/home/home.html to reflect the following:
<ion-header>
  <ion-navbar color="primary">
    <ion-title> cryptoPWA </ion-title>
    <ion-buttons end>
      <button ion-button icon-only (click)="addHolding()">
        <ion-icon name="add"></ion-icon>
      </button>
    </ion-buttons>
  </ion-navbar>
</ion-header>

<ion-content>
  <div class="message" *ngIf="!holdingsProvider.holdings.length">
    <p>
      <strong>cryptoPWA</strong> is a <strong>P</strong>rogressive
      <strong>W</strong>eb <strong>A</strong>pplication that allows you to keep
      track of the approximate worth of your cryptocurency portfolio.
    </p>

    <p>
      A PWA is like a normal application from the app store, but you can access
      it directly through the web. You may also add this page to your home
      screen to launch it like your other applications.
    </p>

    <p>
      No account required, just hit the button below to start tracking your
      coins in whatever currency you wish!
    </p>

    <button ion-button full (click)="addHolding()" color="primary">
      Add Coins
    </button>
  </div>

  <ion-refresher
    *ngIf="holdingsProvider.holdings.length"
    (ionRefresh)="refreshPrices($event)"
  >
    <ion-refresher-content></ion-refresher-content>
  </ion-refresher>

  <ion-list no-lines>
    <ion-item-sliding *ngFor="let holding of holdingsProvider.holdings">
      <ion-item class="holding">
        <p><strong>{{holding.crypto}}/{{holding.currency}}</strong></p>
        <p class="amount">
          <strong>Coins:</strong> {{holding.amount}}
          <strong>Value:</strong> {{holding.value}}
        </p>
        <p *ngIf="holding.value > 0" class="value">
          {{holding.amount * holding.value}}
        </p>
      </ion-item>

      <ion-item-options>
        <button
          ion-button
          icon-only
          color="danger"
          (click)="holdingsProvider.removeHolding(holding)"
        >
          <ion-icon name="trash"></ion-icon>
        </button>
      </ion-item-options>
    </ion-item-sliding>
  </ion-list>
</ion-content>

<ion-footer padding>
  <p>
    <strong>Disclaimer:</strong> Do not use this application to make investment
    decisions. Displayed prices may not reflect actual prices.
  </p>
</ion-footer>
For the most part, this is a pretty standard template. We use *ngFor to create a sliding item for each of the holdings which allow the users to swipe to delete a particular holding. In the case that there are no holdings, we use an *ngIf directive to display a little bit of information about the application instead (and a more prominent button for adding coins).
If you are unfamiliar with structural directives (directives like *ngFor and *ngIf that modify the structure of a template) you may be interested in watching An Introduction to Structural Directives.
We’ve added the <ion-refresher> component for pull to refresh functionality that we will hook up in a moment, but we only display it if there is at least one holding in the list.
In this template, we are accessing the data directly through the provider that we will inject into this page in a moment. Any time the data in the provider is updated, that change would automatically be reflected in the template. Not everybody would agree with accessing the values directly on the provider in this way, but I take this approach in a lot of cases as I find it to generally work out a lot more simply.
Modify src/pages/home/home.ts to reflect the following:
import { Component } from '@angular/core';
import { NavController, IonicPage } from 'ionic-angular';
import { HoldingsProvider } from '../../providers/holdings/holdings';

@IonicPage()
@Component({
  selector: 'page-home',
  templateUrl: 'home.html'
})
export class HomePage {

    constructor(private navCtrl: NavController, private holdingsProvider: HoldingsProvider) {

    }

    ionViewDidLoad(): void {
        this.holdingsProvider.loadHoldings();
    }

    addHolding(): void {
        this.navCtrl.push('AddHoldingPage');
    }

    goToCryptonator(): void {
        window.open('https://www.cryptonator.com/api', '_system');
    }

    refreshPrices(refresher): void {
        this.holdingsProvider.fetchPrices(refresher);
    }

}
For all that it does, the logic for the Home page is actually quite simple, right? This is what I was talking about before, the code for your pages should be as lightweight as possible and not do much “work” at all. We trigger the loadHoldings method on the provider when the view loads, and we have a few other methods. We have a method to trigger the Add Holding page we will create in a moment, a method to trigger a refresh of the prices (which will pass the refresher onto the provider so that it can notify it when the fetch is completed), and a method to open the link to Cryptonator (got to give credit where credit is due, it’s a fantastic API!). Notice that we are just using a simple window.open here instead of the InAppBrowser since we won’t be using Cordova.
Now we are just going to add a few styles to pretty up the page a bit.
Modify src/pages/home/home.scss to reflect the following:
page-home {
ion-footer {
font-size: 0.7em;
color: #474747;
background-color: map-get($colors, light);
}
ion-item-sliding {
margin-top: 10px;
}
.holding {
background-color: #f9f9f9;
text-transform: uppercase;
.amount {
font-size: 0.7em;
}
}
.value {
margin-top: 10px;
font-size: 1.2em;
color: map-get($colors, secondary);
}
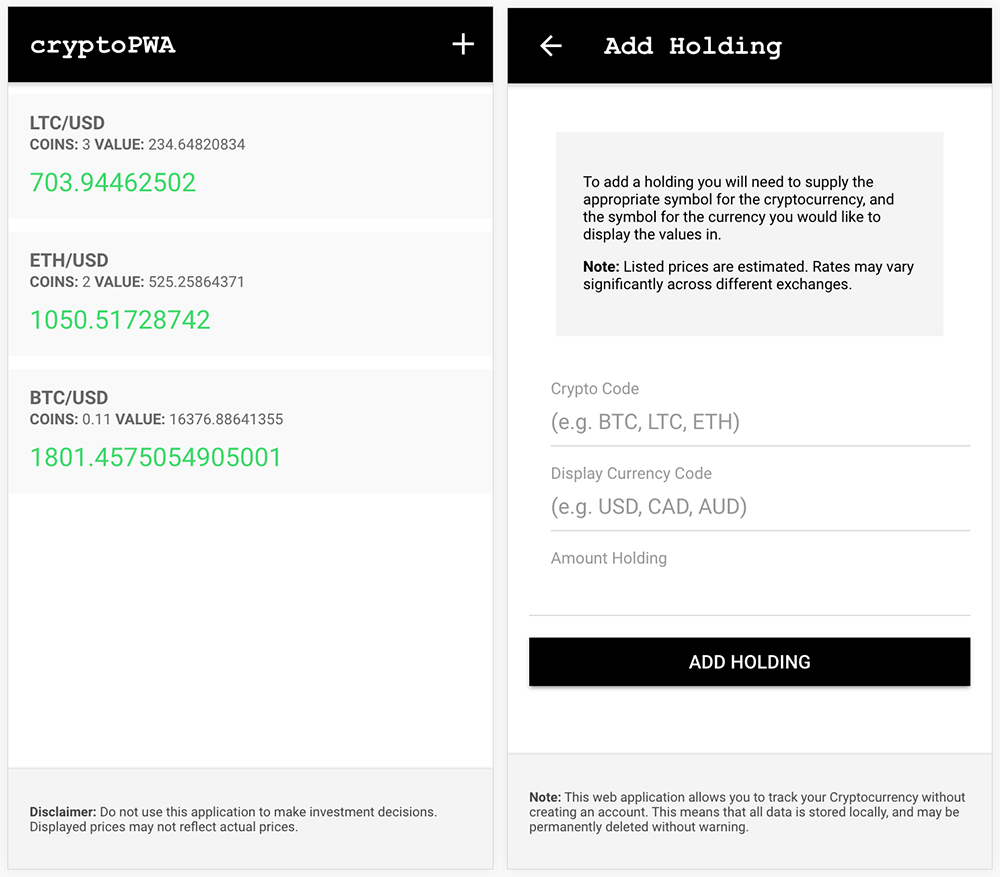
}4. Implement the Add Holding Page
Now we just need to implement the Add Holding page, which will allow users to add a new holding to their list. This is just going to be a simple form using [(ngModel)].
Modify src/pages/add-holding/add-holding.html to reflect the following:
<ion-header>
  <ion-navbar color="primary">
    <ion-title>Add Holding</ion-title>
  </ion-navbar>
</ion-header>

<ion-content padding>
  <div class="message">
    <p>
      To add a holding you will need to supply the appropriate symbol for the
      cryptocurrency, and the symbol for the currency you would like to display
      the values in.
    </p>

    <p>
      <strong>Note:</strong> Listed prices are estimated. Rates may vary
      significantly across different exchanges.
    </p>
  </div>

  <ion-list>
    <ion-item>
      <ion-label stacked>Crypto Code</ion-label>
      <ion-input
        [(ngModel)]="cryptoCode"
        placeholder="(e.g. BTC, LTC, ETH)"
        type="text"
      ></ion-input>
    </ion-item>

    <ion-item>
      <ion-label stacked>Display Currency Code</ion-label>
      <ion-input
        [(ngModel)]="displayCurrency"
        placeholder="(e.g. USD, CAD, AUD)"
        type="text"
      ></ion-input>
    </ion-item>

    <ion-item>
      <ion-label stacked>Amount Holding</ion-label>
      <ion-input [(ngModel)]="amountHolding" type="number"></ion-input>
    </ion-item>
  </ion-list>

  <button ion-button full (click)="addHolding()" [disabled]="checkingValidity">
    Add Holding <ion-spinner *ngIf="checkingValidity"></ion-spinner>
  </button>

  <p class="error-message" *ngIf="cryptoUnavailable">
    Sorry, that combination is not currently available. Make sure to only
    include a single code.
  </p>
</ion-content>

<ion-footer padding>
  <p>
    <strong>Note:</strong> This web application allows you to track your
    Cryptocurrency without creating an account. This means that all data is
    stored locally, and may be permanently deleted without warning.
  </p>
</ion-footer>
Most of this is pretty standard, but we are doing a couple of things to increase the user experience here. It is going to take some time (a couple of seconds) to check the request to add a holding against the API. During this time, we want to let the user know that something is happening, otherwise, the user may think that the application is slow/frozen. This is something referred to as perceived performance (it doesn’t make things happen any faster, the application just feels like it performs better), and is a topic that I go into in quite a bit of depth in Elite Ionic. To deal with this, we add an <ion-spinner> that displays whilst the request is running.
We also have an error message that displays if the cryptocurrency is not available, which we will control by switching a simple flag variable. This is a simple way to display errors to a user, but the danger of “keeping things simple” here is that if the application does become more complicated using this method of error handling will become quite messy. You might be interested in a more scalable solution to handling forms and errors in Ionic.
Now we need to implement the code to handle the form submission and also control these flags.
Modify src/pages/add-holding/add-holding.ts to reflect the following:
import { Component } from '@angular/core';
import { IonicPage, NavController } from 'ionic-angular';
import { HoldingsProvider } from '../../providers/holdings/holdings';

@IonicPage({
    defaultHistory: ['HomePage']
})
@Component({
    selector: 'page-add-holding',
    templateUrl: 'add-holding.html'
})
export class AddHoldingPage {

    private cryptoUnavailable: boolean = false;
    private checkingValidity: boolean = false;
    private cryptoCode: string;
    private displayCurrency: string;
    private amountHolding;

    constructor(private navCtrl: NavController, private holdingsProvider: HoldingsProvider) {

    }

    addHolding(): void {

        this.cryptoUnavailable = false;
        this.checkingValidity = true;

        let holding = {
            crypto: this.cryptoCode,
            currency: this.displayCurrency,
            amount: this.amountHolding || 0
        };

        this.holdingsProvider.verifyHolding(holding).subscribe((result) => {

            this.checkingValidity = false;

            if(result.success){
                this.holdingsProvider.addHolding(holding);
                this.navCtrl.pop();
            } else {
                this.cryptoUnavailable = true;
            }

        }, (err) => {

            this.checkingValidity = false;

        });

    }

}
We’ve added all of the class members that we need, and we’ve set up the addHolding method so that is will first verify that the entered combination exists, and then add it if it does. We’ve also done something a little tricky:
let holding = {
  crypto: this.cryptoCode,
  currency: this.displayCurrency,
  amount: this.amountHolding || 0,
};
By setting the amount this way, it will allow users to skip adding an amount if they want to (say if they just want to track the price or a particular cryptocurrency).
Notice that we also add a defaultHistory to the @IonicPage decorator. Since this will be a progressive web app, a user could easily go directly to the Add Holding page through accessing its URL, meaning that “Add Holding” would be the first page of the application in this case. This would break out navigation, as there would be no way back to the home page. By adding a ‘defaultHistory’ the application knows that the home page should come before the add holding page, and the user will still be able to navigate back to it.
Now we are also just going to add a few styles for this page as well.
Modify src/pages/add-holding/add-holding.scss to reflect the following:
page-add-holding {
  ion-footer {
    font-size: 0.7em;
    color: #474747;
    background-color: map-get($colors, light);
  }

  ion-spinner {
    margin-left: 20px;
  }

  .error-message {
    background-color: map-get($colors, danger);
    color: #fff;
    border: 1px solid #c0392b;
    padding: 10px;
  }
}
5. Additional Styling
We are mostly finished with the first part of this tutorial series, but we are just going to add a few more general styles to the application.
Modify src/app/app.scss to reflect the following:
.toolbar-title {
  font-family: 'Courier New', sans-serif;
  font-weight: bold;
}

.warning-text {
  color: map-get($colors, danger) !important;
}

.message {
  margin: 20px;
  padding: 20px;
  background-color: map-get($colors, light);
  font-size: 0.8em;
}
Modify the Named Color Variables in src/theme/variables.scss to reflect the following:
$colors: (
  primary: #000,
  secondary: #32db64,
  danger: #fb5341,
  light: #f4f4f4,
  dark: #222
);
You can change these colours to something else if you wish! If you serve the application now you should see something like this (once you add some holdings):
Summary
What we have built here is just a standard Ionic application, with not much thought given to the fact that this will be deployed as a progressive web application. There are some specific considerations for a PWA that we need to deal with, but the great thing about Ionic is that it doesn’t matter all that much whether you will be natively compiling the application and submitting it to app stores, or deploying it to the World Wide Web. Most of the work you need to do is the same regardless.
In the following tutorial, we will be extending this application with a few extra features that will enable it to function well as a progressive web application.