
- Native vs Mobile = Progressive
- Lighthouse
- Building your First PWA from Scratch
- Why Page Load Performance and Speed Matter
- Code Splitting and Route-based Chunking
- Server-side Rendering
- PRPL Performance Pattern
- Registering a Service Worker
- Final Results
- Passed Lighthouse Audits
- Chrome DevTools for PWAs
- Chrome DevTools for Emulating Network Conditions
- Conclusion
- Frequently Asked Questions about Progressive Web Apps
Progressive Web Apps (PWAs) try to overlap the worlds of the mobile web apps and native mobile apps by offering the best features of each to mobile users.
They offer an app-like user experience (splash screens and home screen icons), they’re served from HTTPS-secured servers, they can load quickly (thanks to page load performance best practices) even in low quality or slow network conditions, and they have offline support, instant loading and push notifications. The concept of PWAs was first introduced by Google, and is still supported by many Chrome features and great tools, such as Lighthouse, an open-source tool for accessibility, performance and progressiveness auditing which we’ll look into a bit later.
Throughout this crash course, we’ll build a PWA from scratch with ES6 and React and optimize it step by step with Lighthouse until we achieve the best results in terms of UX and performance.
The term progressive simply means that PWAs are designed in a such a way that they can be progressively enhanced in modern browsers where many new features and technologies are already supported but should also work fine in old browsers with no cutting-edge features.
Native vs Mobile = Progressive
A native app is distributable and downloadable from the mobile OS’s respective app store. Mobile web apps, on the other hand, are accessible from within a web browser by simply entering their address or URL. From the user’s point of view, launching a browser and navigating to an address is much more convenient than going to the app store and downloading, installing, then launching the app. From the developer/owner’s point of view, paying a one-time fee for getting an app store account and then uploading their apps to become accessible to users worldwide is better than having to deal with the complexities of web hosting.
A native app can be used offline. In the case of remote data that needs to be retrieved from some API server, the app can be easily conceived to support some sort of SQLite caching of the latest accessed data.
A mobile web app is indexable by search engines like Google, and through search engine optimization you can reach more users. This is also true for native apps, as the app stores have their own search engines where developers can apply different techniques — commonly known as App Store Optimization — to reach more users.
A native app loads instantly, at least with a splash screen, until all resources are ready for the app to execute.
These are the most important perceived differences. Each approach to app distribution has advantages for the end user (regarding user experience, availability etc.) and app owner (regarding costs, reach of customers etc.). Taking that into consideration, Google introduced PWAs to bring the best features of each side into one concept. These aspects are summarized in this list introduced by Alex Russell, a Google Chrome engineer. (Source: Infrequently Noted.)
- Responsive: to fit any form factor.
- Connectivity independent: progressively-enhanced with service workers to let them work offline.
- App-like-interactions: adopt a Shell + Content application model to create appy navigations & interactions.
- Fresh: transparently always up-to-date thanks to the service worker update process.
- Safe: served via TLS (a service worker requirement) to prevent snooping.
- Discoverable: are identifiable as “applications” thanks to W3C Manifests and service worker registration scope allowing search engines to find them.
- Re-engageable: can access the re-engagement UIs of the OS; e.g. push notifications.
- Installable: to the home screen through browser-provided prompts, allowing users to “keep” apps they find most useful without the hassle of an app store.
- Linkable: meaning they’re zero-friction, zero-install, and easy to share. The social power of URLs matters.
Lighthouse
Lighthouse is a tool for auditing web apps created by Google. It’s integrated with the Chrome Dev Tools and can be triggered from the Audits panel.
You can also use Lighthouse as a NodeJS CLI tool:
npm install -g lighthouse
You can then run it with:
lighthouse https://sitepoint.com/
Lighthouse can also be installed as a Chrome extension, but Google recommends using the version integrated with DevTools and only use the extension if you somehow can’t use the DevTools.
Please note that you need to have Chrome installed on your system to be able to use Lighthouse, even if you’re using the CLI-based version.
Building your First PWA from Scratch
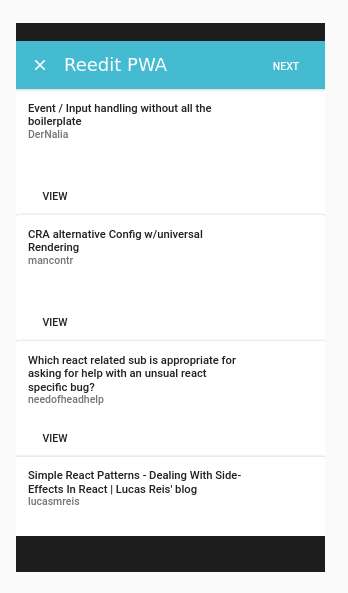
In this section, we’ll be creating a progressive web app from scratch. First, we’ll create a simple web application using React and Reddit’s API. Next, we’ll be adding PWA features by following the instructions provided by the Lighthouse report.
Please note that the public no-authentication Reddit API has CORS headers enabled so you can consume it from your client-side app without an intermediary server.
Before we start, this course will assume you have a development environment setup with NodeJS and NPM installed. If you don’t, start with the awesome Homestead Improved, which is running the latest versions of each and is ready for development and testing out of the box.
We start by installing Create React App, a project boilerplate created by the React team that saves you from the hassle of WebPack configuration.
npm install -g create-react-app
create-react-app react-pwa
cd react-pwa/
The application shell architecture
The application shell is an essential concept of progressive web apps. It’s simply the minimal HTML, CSS and JavaScript code responsible for rendering the user interface.
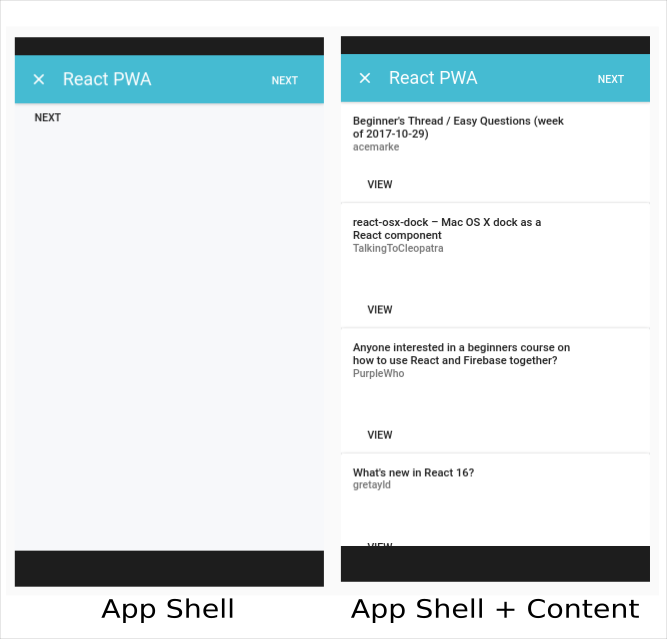
This app shell has many benefits for performance. You can cache the application shell so when users visit your app next time, it will be loaded instantly because the browser doesn’t need to fetch assets from a remote server.
For building a simple UI we’ll use Material UI, an implementation of Google Material design in React.
Let’s install the package from NPM:
npm install material-ui --save
Next open src/App.js then add:
import React, { Component } from 'react';
import MuiThemeProvider from 'material-ui/styles/MuiThemeProvider';
import AppBar from 'material-ui/AppBar';
import {Card, CardActions, CardHeader,CardTitle,CardText} from 'material-ui/Card';
import FlatButton from 'material-ui/FlatButton';
import IconButton from 'material-ui/IconButton';
import NavigationClose from 'material-ui/svg-icons/navigation/close';

import logo from './logo.svg';
import './App.css';

class App extends Component {

  constructor(props) {
    super(props);

    this.state = {
      posts: []
    };
  }

  render() {
    return (

      <MuiThemeProvider>
        <div>
          <AppBar
            title={<span >React PWA</span>}

            iconElementLeft={<IconButton><NavigationClose /></IconButton>}
            iconElementRight={<FlatButton onClick={() => this.fetchNext('reactjs', this.state.lastPostName)} label="next" />
            }
          />

          {this.state.posts.map(function (el, index) {
            return <Card key={index}>
              <CardHeader
                title={el.data.title}

                subtitle={el.data.author}
                actAsExpander={el.data.is_self === true}
                showExpandableButton={false}
              />

              <CardText expandable={el.data.is_self === true}>
                {el.data.selftext}
              </CardText>
              <CardActions>
                <FlatButton label="View" onClick={() => {
                  window.open(el.data.url);
                }} />

              </CardActions>
            </Card>
          })}


          <FlatButton onClick={() => this.fetchNext('reactjs', this.state.lastPostName)} label="next" />
        </div>
      </MuiThemeProvider>

    );
  }
}

export default App;
Next we need to fetch the Reddit posts using two methods fetchFirst() and fetchNext():
  fetchFirst(url) {
    var that = this;
    if (url) {
      fetch('https://www.reddit.com/r/' + url + '.json').then(function (response) {
        return response.json();
      }).then(function (result) {

        that.setState({ posts: result.data.children, lastPostName: result.data.children[result.data.children.length - 1].data.name });

        console.log(that.state.posts);
      });
    }
  }
  fetchNext(url, lastPostName) {
    var that = this;
    if (url) {
      fetch('https://www.reddit.com/r/' + url + '.json' + '?count=' + 25 + '&after=' + lastPostName).then(function (response) {
        return response.json();
      }).then(function (result) {

        that.setState({ posts: result.data.children, lastPostName: result.data.children[result.data.children.length - 1].data.name });
        console.log(that.state.posts);
      });
    }
  }
  componentWillMount() {

     this.fetchFirst("reactjs");
}
You can find the source code in this GitHub Repository.
Before you can run audits against your app you’ll need to make a build and serve your app locally using a local server:
npm run build
This command invokes the build script in package.json and produces a build in the react-pwa/build folder.
Now you can use any local server to serve your app. On Homestead Improved you can simply point the nginx virtual host to the build folder and open homestead.app in the browser, or you can use the serve package via NodeJS:
npm install -g serve
cd build
serve
With serve, your app will be served locally from http://localhost:5000/.
You can audit your app without any problems, but in case you want to test it in a mobile device you can also use services like surge.sh to deploy it with one command!
npm install --global surge
Next, run surge from within any directory to publish that directory onto the web.
You can find the hosted version of this app from this link.
Now let’s open Chrome DevTools, go to Audits panel and click on Perform an audit.
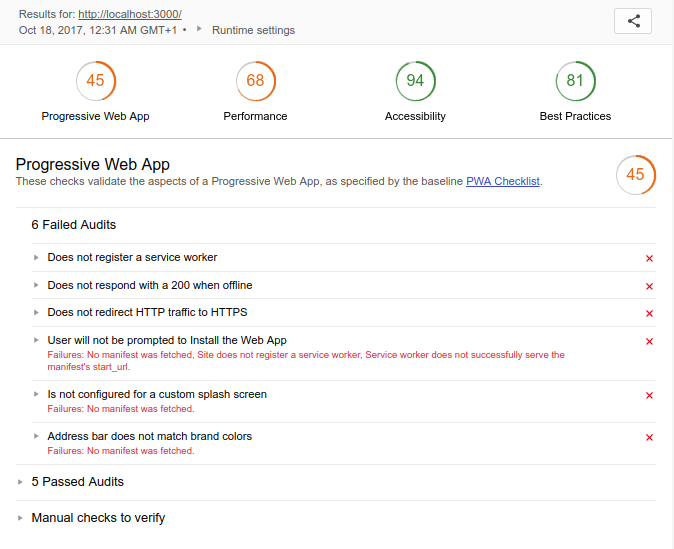
From the report we can see we already have a score of 45/100 for Progressive Web App and 68/100 for Performance.
Under Progressive Web App we have 6 failed audits and 5 passed audits. That’s because the generated project already has some PWA features added by default, such as a web manifest, a viewport meta and a <no-script> tag.
Under Performance we have diagnostics and different calculated metrics, such as First meaningful paint, First Interactive, Consistently Interactive, Perceptual Speed Index and Estimated Input Latency. We’ll look into these later on.
Lighthouse suggests improving page load performance by reducing the length of Critical Render Chains either by reducing the download size or deferring the download of unnecessary resources.
Please note that the Performance score and metrics values can change between different auditing sessions on the same machine, because they’re affected by many varying conditions such as your current network state and also your current machine state.
Why Page Load Performance and Speed Matter
According to DoubleClick (a Google advertising company), 53% of mobile sites visits are abandoned if it takes more than 3 seconds to load the page. By optimizing page load performance and speed, PWAs offer instant web experiences to users via a set of techniques and strategies that we’ll look at next.
Consider performance before you start building your PWA
The majority of client-side apps are built using some sort of JavaScript library or framework such as React, Preact, Angular, Vue etc. If you’re building a PWA you need to make sure you choose a mobile-first library or, in other words, a library that’s designed for the mobile web in the first place. Otherwise, optimizing your app for performance will be an impossible mission.
You need to use different testing tools, like Chrome DevTools, Lighthouse, Google PageSpeed and others, to test your app heavily under different and simulated network conditions, so you can successfully optimize your app page load performance.
PWA performance metrics you need to put on your radar
You can use Lighthouse for measuring and optimizing your app’s page load performance with different metrics, diagnostics, and opportunities.
Lighthouse uses different metrics. Let’s cover them one by one:
First meaningful paint
First meaningful paint is a measure that simply indicates the time at which the user can see meaningful or primary content on the screen. The lower this audit is, the better the perceived performance of your app.
Here’s this metric for our app.
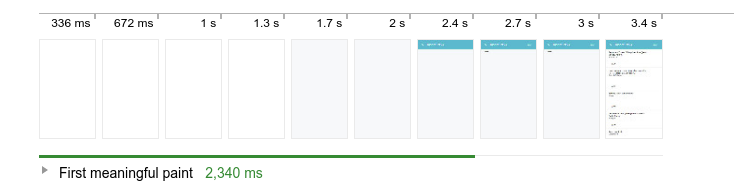
We see that from 1.3s the browser started to render the empty background, then from 2s the browser started rendering the header, 2.4s both the buttons on the header and the bottom are rendered. It’s not until the third second that the posts are rendered. The whole process took 3.4 seconds and the first meaningful paint equals 2.340ms — when the header without the next button is rendered.
A first meaningful paint is really dependent on what we can consider as meaningful, which can be different between different users. If a user is only interested in reading the posts, then the first meaningful paint for them is after the 3 seconds mark. You can see how Google calculates this metric from this document.
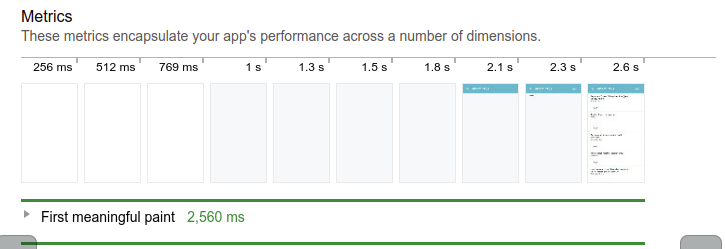
This is another filmstrip for the same app where Lighthouse reported the FMP as 2.560ms at the last screenshot where post headlines are fully displayed in the above-the-fold area.
Secondly, you can see that the page is rendered progressively, not at once, which is a good indication of performance.
You can optimize this measure by optimizing the critical rendering path.
The critical rendering path
The critical rendering path is a concept related to how web browsers render pages — that is, from the first moment of receiving HTML, CSS and JavaScript assets to the step where the browser processes and renders actual meaningful content. To optimize the critical rendering path, you need to give higher priority to content that’s related to the user’s current action. That is, if they’re about to visit your app, you can start by first displaying the visible part of the UI, or what’s called the above-the-fold area.
For more details, you can read “Optimizing the Critical Rendering Path”.
You can also see this list of curated tools for inlining critical CSS assets. Also check these tools for inlining JavaScript and other assets:
- inliner: a Node utility to inline images, CSS and JavaScript for a web page
- inline-source: a tool for inlining flagged JS, CSS, and IMG sources in HTML
- inline-source-cli: a CLI tool for inline-source.
Critical Request Chains
Critical Request Chains is a concept related to the Critical Rendering Path and can be represented by a diagram which breaks down critical resources to render a page, how much time each resource takes and how many bytes to download for each resource. You can use the Critical Request Chains diagram to get a better understanding of critical resources to eliminate, defer or mark as async. Here is a screen shot from our example PWA report:
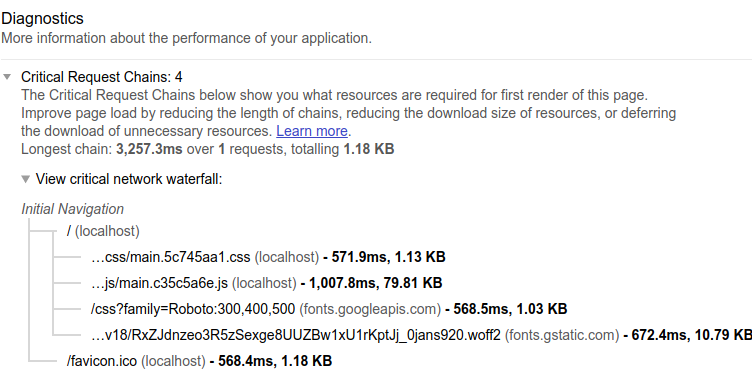
Now let’s try to resolve this issue using inline-source and inline-source-cli:
npm install -g inline-source inline-source-cli
We then navigate inside the build folder and open index.html, then add the keyword inline to <link> and <script> elements we want to inline:
<link inline href="/static/css/main.5c745aa1.css" rel="stylesheet">
<script inline type="text/javascript" src="/static/js/main.c35c5a6e.js"></script>
Let’s inline these resources:
cd build
cat ./index.html | inline-source --root ./  > ./index.html
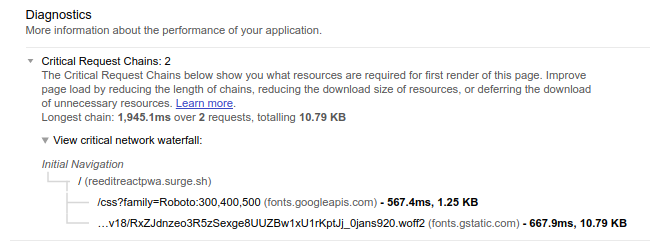
By inlining CSS and JavaScript assets, we’ve reduced the Critical Request Chains to 2.
First Interactive and Consistently Interactive
These two metrics both indicate the time for the user to be able to interact with the app. Both metrics express engage-ability and usability, but there’s a difference between them. First Interactive measures when the page is minimally interactive, while consistently Interactive measures when the page is fully interactive.
You can optimize the time to be interactive by optimizing the critical rendering path.
Perceptual Speed Index
Perceptual Speed Index is a metric that measures the above-the-fold visual performance of a page while taking into consideration the layout stability (no sudden displacement of UI elements). It simply indicates how quickly the page contents are visibly populated.
PSI is a modified version of the SI or Speed Index metric, which is the average time at which the above-the-fold (visible) area is displayed without taking into account the visual stability.
You can also optimize this metric by optimizing the critical rendering path.
Estimated input latency
Estimated input latency is a metric that indicates when the main thread becomes ready to process input.
You can read more about this metric and how to pass it here.
Time to first byte (TTFB)
Wikipedia defines TTFB as:
Time to first byte (TTFB) is a measurement used as an indication of the responsiveness of a web server or other network resource. TTFB measures the duration from the user or client making an HTTP request to the first byte of the page being received by the client’s browser.
You can use tools like WebpageTest and Lighthouse to measure TTFB of your PWA. For more information see this link.
Let’s now see a set of concepts and common techniques used by developers to optimize these metrics.
Code Splitting and Route-based Chunking
The JavaScript ecosystem has changed drastically in recent years, with new tools such as module bundlers like WebPack and Browserify, which are used to bundle all scripts into one file. This is considered good practice, since it helps reduce network requests for multiple script files to just one request (for getting the whole bundle), optimizing the critical rendering path (no long-blocking JavaScript and CSS assets). But the problem is, for large apps, the bundle will have a larger size, making the process of downloading the bundle, processing it, then booting up the application very inefficient, which affects the instant web experience (increasing the time for the first meaningful paint and the time for the UI to become interactive).
As a solution for this problem, different apps use code splitting and route-based chunking (splitting code into chunks which are only required for each route). So the browser only needs to download the first chunk needed to render the first page/route, then lazy loads the remaining chunks when the user is navigating other routes.
Server-side Rendering
Server-side rendering is the process of rendering the initial content on the server instead of the browser — which may, in many situations, improve the page load performance, since the browser can display content (plain HTML) immediately after downloading it.
Server-side rendering alone won’t help much in optimizing the time for the user to be interactive, since JavaScript assets need to be downloaded and booted up.
PRPL Performance Pattern
PRPL is a performance pattern which makes use of concepts such as HTTP/2 Server Push, Preload headers, service workers, and lazy loading to improve the performance of PWA delivery and launch.
PRPL stands for:
- Push critical resources for the initial URL route
- Render initial route
- Pre-cache remaining routes
- Lazy load and create remaining routes on demand.
Source: Google Web Fundamentals
Optimizing performance via caching
Caching is the process of keeping frequently requested data in a close storage location. For the web, that’s the browser memory or database. A browser actually has a cache location specifically designed for caching network responses, but developers can also leverage other storage mechanisms such as the HTML5 Local Storage API and IndexedDB.
You can cache the application shell (assets responsible for rendering the UI), data, or ideally both. Caching the UI is crucial for achieving an instant web experience. But what about data?
We can consider two categories of apps here. Apps that only need a network connection for getting assets responsible for rendering the UI and/or need it for providing the core functionality. Think, for example, of an app that provides personal accounting for users, which only depends on algorithms and calculations (local CPU).
The second category are apps that depend on remote servers to get updated information. You may wonder why you need to cache data, given that it will soon become obsolete and users mostly need updated information. The thing is, in many parts of the world the problem is not the permanent interruption of the network connection, but the fluctuating state of the network between slow and good signals, and that’s what affects the user experience even if the app is already loaded.
The app can make use of data caching (taking advantage of the Background Sync API) to guarantee its service when users are navigating between pages, or even if they leave and come back to the app in a short period of time, by continuously watching the network state, then resume fetching/sending data without interrupting the user.
Now let’s resolve the failed issues for better scores.
Registering a Service Worker
The first failed audit is saying that the app does not register a service worker. Before changing that, let’s first understand service workers and related features.
A service worker is a modern browser technology that can be used as a client-side proxy that allows your app (by intercepting network requests) to implement caching for adding features such as instant loading and offline support etc.
Service workers can also be used for implementing updates and engaging with push notifications.
Service workers can’t access the page DOM, but can communicate with a client (a Window, Worker, or SharedWorker) via the postMessage() method.
Many browser APIs are available for use inside service workers, such as:
- the Fetch API: for fetching content (sending requests and getting responses) from a remote server
- the Cache API: for caching content (create cache stores of responses keyed by requests)
- the Push API: for getting push notifications
- the Background Sync API: allows the web app to defer actions until the user has stable connectivity.
A service worker has many lifecycle events that need to be handled properly.
- an install event: you get install events when the app is first visited by a user and the service worker is downloaded and installed
- an activate event: triggered after calling
.register()(after download and install events) - a fetch event: you get fetch events in case of navigation within a service worker’s scope or any requests triggered scope pages.
The React project already contains a service worker. We can either use it or create a new one so we can get a better idea of how service workers work.
In the public folder, let’s create a new file named service-worker.js, then register it from the public/index.html file by adding the following code before</body>:
    <script>

      if ('serviceWorker' in navigator) {

        window.addEventListener('load', function() {

          navigator.serviceWorker.register('service-worker.js').then(function(registration) {

            console.log('Service Worker successfully registered');

          }, function(err) {

            console.log('Error when registering the Service Worker  ', err);

          }).catch(function(err) {

            console.log(err)

          });

        });
      } else {

        console.log('No Support For Service Workers');

      }

    </script>
This piece of code first checks if service workers are supported in the browser, then listens for the page load event. When the page is loaded, it invokes the navigator.serviceWorker.register method to register public/service-worker.js.
Now we need to create a JavaScript file public/service-worker.js and add this code to set up caching:
self.addEventListener('install', function(event) {

    event.waitUntil(
      caches.open('react-pwa-v1')
        .then(function(cache) {
          // The asset-manifest.json contains the names of assets to cache

          fetch("asset-manifest.json")
            .then(response => {
              return response.json()
            })
            .then(assets => {

              cache.addAll(
                [
                  "/",
                  "https://fonts.googleapis.com/css?family=Roboto:300,400,500",
                  assets["main.js"],
                  assets["main.css"],
                  assets["static/media/logo.svg"]
                ]
              );

            })
        })
    );

});
In the service worker install event, we first open the cache with the caches.open() method, then we use fetch() to get the asset-manifest.json file that’s generated by WebPack to map hashed assets to their original names. Next, we invoke cache.addAll() to add these assets to the application cache:
// Serves the cached response for the corresponding request

self.addEventListener('fetch', function(event) {

    event.respondWith(
          caches.match(event.request).then(function(response) {
              if(response) return response;
              return fetch(event.request);
          })
    );

});
This code intercepts every network request by listening to the fetch event and responding with the cached response if it exists in the application cache (using the caches.match() method). Otherwise, we normally call fetch() to get the asset:
self.addEventListener("activate", event => {
  event.waitUntil(
    caches.keys()
      .then(keys =>
        Promise.all(keys.map(key => {
          if (key !== 'react-pwa-v1') {
            return caches.delete(key);
          }
        }))
      )
  );
});
When the app is activated, we delete the old cache if different from the current one.
This is a simple service worker for caching static assets. We can also use advanced tools for generating service workers such as:
- sw-precache: a NodeJS module created by Google, designed to be integrated with your build system to generate a service worker for adding offline support
- sw-toolbox: also created by Google to provide helpers and common caching strategies for dynamic caching to help you create your own service worker.
Final Results
If we run audits against our app now, we should get a PWA score of 91.
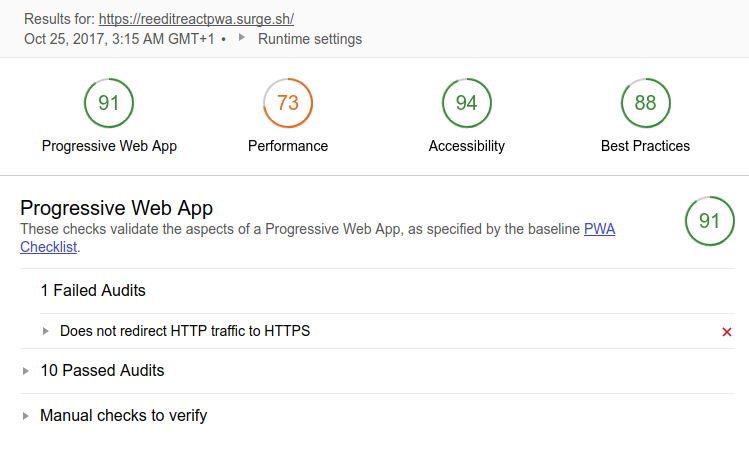
The app can now prompt users to install it on the home screen or shelf of a device.

We have one failed audit, which says that we need to redirect HTTP traffic to HTTPS, but that’s a little outside the scope of this post. Once we do this, however, these are the final results for performance:
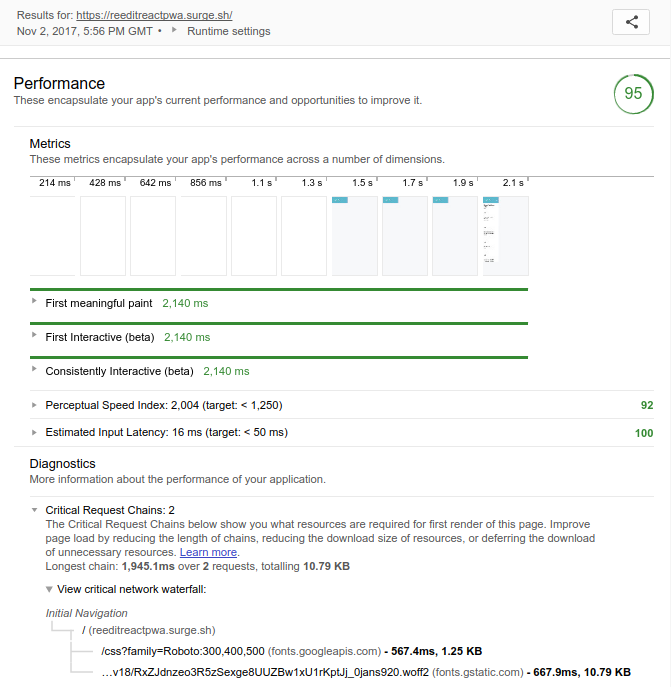
By reducing the critical request chains via JavaScript and CSS inlining, we’ve optimized the critical rendering path, which most of the performance metrics we saw previously depend on. But please keep in mind, this PWA is very simple; it only has one page, and React is designed with performance in mind. That’s the reason we have achieved a score of 95/100 for performance so quickly.
Passed Lighthouse Audits
In order to cover all core tenets of progressive web apps, I’ll also explain the passed audits in Lighthouse report.
HTTPS
Since we’re auditing the app locally (origin: http://localhost), Lighthouse assumes it’s secured, so the HTTPS audit is marked as passed, but that’s not going to happen once you use an actual host and link a top-level domain name unless you actually have an SSL certificate. (Note that service workers are only served from secure origins, except in the case of localhost.)
You can host your app with GitHub Pages which gives you an HTTPS-secured subdomain (github.io). You can also use Firebase hosting with a secured subdomain or Surge (surge.sh) that also comes with a basic SSL certificate for free.
If you decide to link your own top-level domain, you also have the opportunity to get a free SSL certificate with Let’s Encrypt or Cloudflare.
For this course, we don’t actually need to host the application with an HTTPS-secured server, since Lighthouse passes this audit when testing locally.
The web app manifest
A web app manifest is a JSON file that provides information about a PWA, such as name, icons and description, among many other things. It allows users to install the web app on the home screen just like native apps, but without going through an app store.
A web app manifest needs to be referenced from an index.html file using a <link> tag with rel property set as manifest.
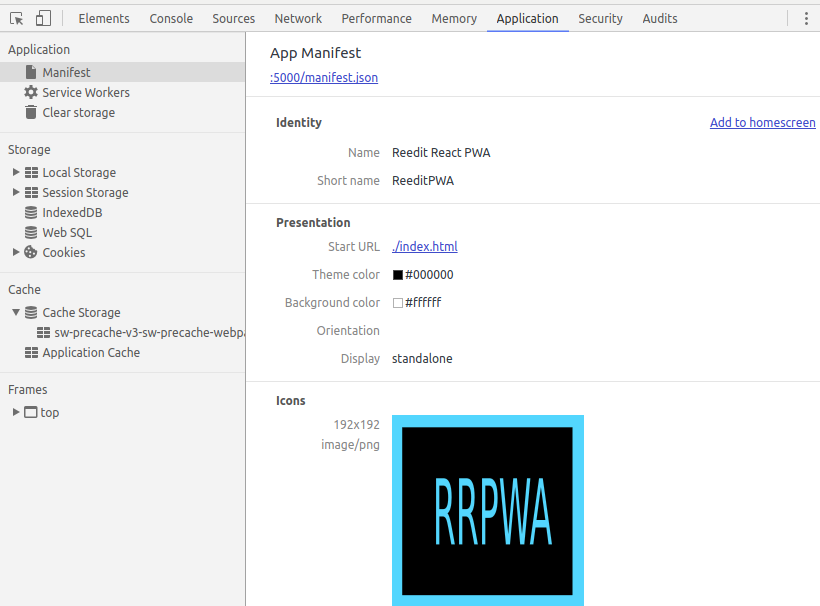
For example, the simple generated React app has a public/manifest.json file with the following content:
{
  "short_name": "ReeditPWA",
  "name": "Reedit React PWA",
  "icons": [
    {
      "src": "icon-192x192.png",
      "sizes": "192x192",
      "type": "image/png"
    }
  ],
  "start_url": "./index.html",
  "display": "standalone",
  "theme_color": "#000000",
  "background_color": "#ffffff"
}
It’s referenced from public/index.html:
<link rel="manifest" href="%PUBLIC_URL%/manifest.json">
Perceived performance and the splash screen
Browsers had no support for PWA splash screens before, so when users run the app from the home screen icon they often go through a white screen for a few seconds before they can see the actual app user interface. From Chrome 47 onwards, users can see a splash screen, which increases the perceived performance and transitions the user from tapping the home screen icon to an app’s first paint.
Simply put, perceived performance is a measure that’s more related to a user’s perspective and experience than the real performance/page load speed — providing information about how fast your app actually feels to end users.
You can read the perception of performance article for more on this.
This splash screen is constructed for your app dynamically from the information in the web manifest, but (according to Lighthouse) you need to have an icon of at least 512×512 size in your manifest.json file for a high-quality splash screen.
So just prepare an icon of at least 512×512 size, then add the following to your manifest.json under the icons array:
{
    "src": "splashscreen-icon-512x512.png",
    "sizes": "512x512",
    "type": "image/png"
}
Progressive enhancement
One of the core tenets of PWAs is progressive enhancement, which refers to the capability of PWAs to run on different browsers but provide more advanced features only if they’re supported.
You can also read “The JavaScript-Dependency Backlash: Myth-Busting Progressive Enhancement” to understand more about progressive enhancement.
A simple example of progressive enhancement is when an app is executed in a browser that doesn’t support JavaScript, or at least when JavaScript is disabled. Instead of showing nothing, you can use the HTML <noscript> tag to tell users that they should enable JavaScript:
<noscript>
You need to enable JavaScript to run this app.
</noscript>
Chrome DevTools for PWAs
Chrome is the first browser with official support for PWAs. As such, Chrome’s DevTools have excellent features for debugging PWAs, specifically contained in two panels — the Audit panel and the Application panel.
Under the Audit panel you can find the Lighthouse tool we saw previously. Under the Application panel you can find many useful tools for debugging the core aspects of PWAs, such as:
- the Web Manifest displayer, which displays the web manifest file related to your PWA and allows you to install the app on the shelf
- the Service Worker debugger, which allows you to see all service workers installed with your app, to start and stop them and emulate offline state
- the Storage viewer, which allows you to see and clear IndexedDB, LocalStoarge and Session Storage for your app
- the Cache viewer, which allows you to see and clear the app cache created using the Cache API.
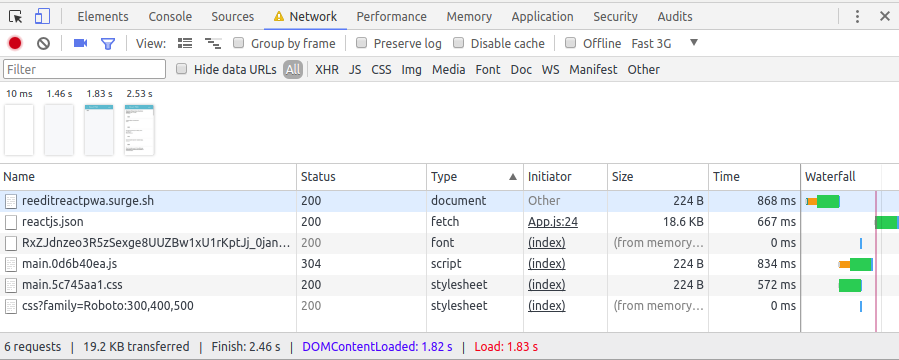
Chrome DevTools for Emulating Network Conditions
In many parts of the world, mobile devices are connected through slow and flaky networks, so in order to provide a better user experience and acceptable load time — or, better yet, for instant web experiences for a large base of users with varying network speeds — you need to optimize your app under potentially different conditions. Thanks to the Chrome DevTools Network panel, you can emulate multiple network conditions such as slow 3G, fast 3G and offline state, and you can even create custom profiles with your own custom values for Download, Upload and Latency parameters.
The Network panel provides other features such as cache disabling, turning offline state and taking app screenshots in load time.
Both disabling cache and activating offline state are particularly useful for debugging PWAs.
For more information, check out Google’s “Network Analysis Reference”.
Conclusion
A PWA is not just another performance-focused app. It’s more than that! Thanks to the big players in the software industry — Google, Microsoft etc. — they’re becoming first-class apps on multiple platforms.
Aside from the performance benefits you can also incorporate into any web app, even if you don’t intend to build a fully qualified PWA, PWAs provide the following:
- Delivery of the best experiences to users by taking advantages of modern standards and best practices.
- Add-to-home-screen banners so users can be prompted to add your PWA to their home screens. This happens when browsers detect that your app is engaging. The simplest example of the level of engagement needed is when the user uses your PWA again after a short period of time.
- Samsung Internet 5.2 introduced a feature called ambient badging that alerts users when they’re viewing a PWA, so that it can be installed on their home screen.
- Opera for Android also introduced ambient badging.
- As of Chrome 59, when a user installs your PWA, an APK will be created and installed on the user’s device, meaning that your PWA becomes a real Android app with an
<intent-filter>, which tells Android to intercept clicks on any links belonging to your app scope and open your PWA instead of Chrome. - Microsoft announced Edge support for PWAs is coming soon. More than that, at the Edge Web Summit in 2017, Microsoft announced it’s bringing PWAs to the Windows Store so they’ll be searchable, discoverable and installable as first-class apps from Windows Store and the Bing search engine.
Hopefully, this crash course has helped you get started with PWA-ifying your own web app!
Frequently Asked Questions about Progressive Web Apps
What are the key benefits of using Progressive Web Apps (PWAs) over traditional web applications?
Progressive Web Apps (PWAs) offer several advantages over traditional web applications. Firstly, they are highly responsive, meaning they can adapt to any form factor, desktop, mobile, tablet, or forms yet to emerge. Secondly, they are connectivity-independent, which means they can work offline or on low-quality networks. PWAs are also app-like, which means they use the app-shell model to provide app-style navigation and interactions. They are also fresh, always up-to-date thanks to the service worker update process. PWAs are safe, served via HTTPS to prevent snooping and ensure content hasn’t been tampered with. Lastly, they are discoverable, identifiable as “applications” thanks to W3C manifests and service worker registration scope, allowing search engines to find them.
How do Progressive Web Apps improve user engagement?
PWAs significantly improve user engagement by offering an immersive, full-screen experience through a web app manifest file and can even re-engage users with web push notifications. The Web App Manifest allows you to control how your app appears and how it’s launched. You can specify home screen icons, the page to load when the app is launched, screen orientation, and even whether or not to show the browser chrome. This level of control improves user engagement by providing a user experience similar to native apps.
Can Progressive Web Apps be developed with any programming language?
PWAs are not tied to a specific programming language. They are built using standard web technologies, including HTML, CSS, and JavaScript. However, they run in a standard web browser. This means you can use any technology to build a PWA as long as it can run in a web browser and can be served over a network.
How do Progressive Web Apps work offline?
PWAs can work offline by utilizing service workers, a type of web worker. Service workers function as a network proxy, intercepting network requests to deliver programmatic or cache-based responses. They are event-driven and run only when needed, so they don’t consume resources when not in use. This allows PWAs to cache or save content and serve it directly from the cache when there’s no network connection.
Are Progressive Web Apps SEO friendly?
Yes, PWAs are SEO friendly. They are discoverable by search engines because they’re built with standard web technologies, and they use Service Workers, which allow them to load instantly, regardless of the network state. This fast loading and the ability to function offline can lead to more time spent on the app and lower bounce rates, which can positively impact SEO.
How do Progressive Web Apps enhance performance?
PWAs enhance performance by utilizing service workers to cache assets and other data. This allows the PWA to load instantly and provide a smooth user experience. The use of the PRPL pattern (Push, Render, Pre-cache, Lazy-load) also helps in enhancing the performance of PWAs. This pattern allows for the efficient loading and rendering of the critical resources, improving the overall speed of the app.
Can Progressive Web Apps use device features?
Yes, PWAs can access and use many device features such as geolocation, camera, and even push notifications, similar to native apps. This is possible through the use of web APIs. However, the extent to which a PWA can access device features depends on the browser support for those APIs.
How are Progressive Web Apps different from native apps?
While PWAs and native apps can offer similar functionalities, they differ in several ways. PWAs are built using web technologies and run in a web browser, while native apps are developed for specific platforms using languages like Swift for iOS or Java for Android. PWAs are typically easier and faster to develop and update than native apps. They are also more lightweight and don’t require users to download anything from an app store.
What is the future of Progressive Web Apps?
The future of PWAs looks promising. With advancements in web technologies and improved browser support, PWAs are becoming a viable alternative to native apps. They offer the potential for faster, more efficient development and deployment, and a better, more seamless user experience. As more businesses recognize these benefits, it’s likely that the use of PWAs will continue to grow.
What are some examples of successful Progressive Web Apps?
There are many examples of successful PWAs across various industries. Twitter’s PWA, Twitter Lite, is one of the most notable examples, offering a faster, more data-efficient experience for users. Other examples include Starbucks, which allows customers to browse the menu, customize their orders, and add items to their cart, all while offline. The Weather Channel’s PWA provides reliable weather information with a 80% improvement in load time compared to their previous mobile web experience.
 Ahmed Bouchefra
Ahmed is a technical author and web developer living in Morocco with a Master's degree in software development. He authors technical content about JavaScript, Angular and Ionic. He is also a fan of entrepreneurship, poetry, and teaching. You can contact me on my personal website and read my other articles on Techiediaries.