

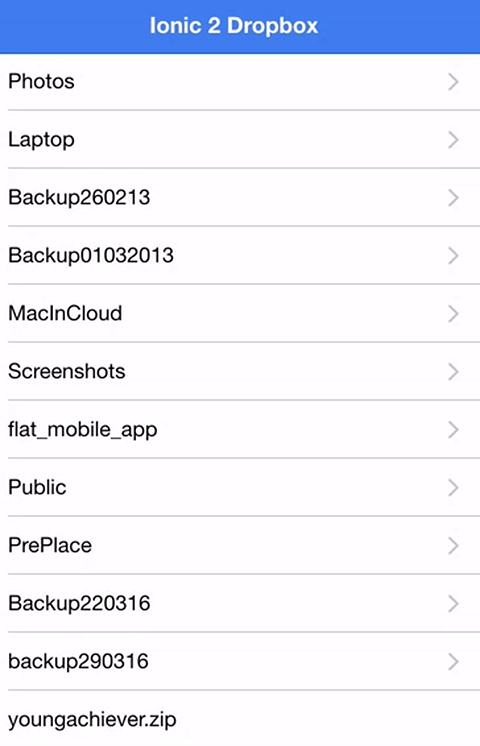
In Part 1 of this series of tutorials we started integrating Dropbox with an Ionic 2 application. We were able to create an application that can fetch a list of all the files and folders in a users Dropbox, and also allow the user to browse through their folders. The end result looked like this:
The problem with what we have so far is that the access token is manually generated and specific to one user (you). You couldn’t release this application because rather than each user being able to access their own Dropbox, everybody would be able to access yours (probably not what you want).
In this part of the tutorial, we are going to be using the Dropbox OAuth 2 flow to authenticate a user and retrieve their access token. We will be adding a login screen to the application that will trigger this process and only allow the user into the main application once they have been authenticated.
There are two different OAuth authentication flows for Dropbox, but the one we will be using goes something like this:
- Redirect user to Dropbox for authentication
- User logs in
- User is asked if they want to grant access to our application
- An access token is sent back to us via a URL parameter
That access token that is returned is the same as the token we manually generated in the last tutorial, except that it is specific to their account. There are a few challenges in implementing this authentication process in an Ionic 2 application, so let’s start walking through how to do it.
Before we Get Started
Last updated for Ionic 3.2.1
This tutorial builds on top of the last tutorial so if you want to follow along then you will need to complete Part 1 first.
1. Add a Redirect URI
At this point, you should already have an application set up in your Dropbox account (this is where you generated the access token in the last lesson). Now we will have to list the Redirect URI that we want to use for the authentication flow, and in our case that is going to be http://localhost:
Add the Redirect URI to your Dropbox application as shown below:

2. Install the InAppBrowser Plugin
As I mentioned above, part of the OAuth authentication process is to redirect the user to the Dropbox website to log in. We need to keep the user in the context of our application, though, so by installing the InAppBrowser plugin we are able to launch a browser window within our application. This also allows us to listen to what’s happening in the browser, which is critical for us to complete the OAuth process.
Run the following commands to install InAppBrowser
ionic cordova plugin add cordova-plugin-inappbrowser
npm install --save @ionic-native/in-app-browser
3. Modify the Dropbox Provider
Now we are going to modify the Dropbox provider we created last time to include the functionality we need to use OAuth with Dropbox. First, we are going to import the InAppBrowser plugin, and we are also going to be importing Observable because it is required for subscribing to the observable the browser returns.
Add the following imports to dropbox.ts:
import { InAppBrowser } from '@ionic-native/in-app-browser';
import { Observable } from 'rxjs/Observable';
We will be using Ionic Native to use this plugin so we need to import that here, but remember you can just use the plugin directly if you like. You can read more about the difference between Cordova and Ionic Native here if you like.
Next, we will need to add a few extra member variables to our constructor.
Modify the
constructorfunction in dropbox.ts to reflect the following:
accessToken: any;
  folderHistory: any = [];
  appKey: any;
  redirectURI: any;
  url: any;

  constructor(public http: Http, public iab: InAppBrowser) {

      //OAuth
      this.appKey = 'b4tucj2g56vm0qs';
      this.redirectURI = 'http://localhost';
      this.url = 'https://www.dropbox.com/1/oauth2/authorize?client_id=' + this.appKey + '&redirect_uri=' + this.redirectURI + '&response_type=token';

  }
We’ve got the same variables as last time, but we also have some additional OAuth variables. You will need to supply your applications own App Key here which you can find in your developer console for Dropbox. We also need to supply the Redirect URI which should be http://localhost. These two values are then used to make up the URL that the user will be pointed to, to start the OAuth process.
Now we are going to add the most interesting function, which is the login function that handles the OAuth process.
Add the following function to dropbox.ts:
login(){

    return new Promise((resolve, reject) => {

      let browser = this.iab.create(this.url, '_blank');

      let listener = browser.on('loadstart').subscribe((event: any) => {

        //Ignore the dropbox authorize screen
        if(event.url.indexOf('oauth2/authorize') > -1){
          return;
        }

        //Check the redirect uri
        if(event.url.indexOf(this.redirectURI) > -1 ){
          listener.unsubscribe();
          browser.close();
          let token = event.url.split('=')[1].split('&')[0];
          this.accessToken = token;
          resolve(event.url);
        } else {
          reject("Could not authenticate");
        }

      });

    });

  }
This function will be called from the login page that we will create later. Parts of this code (specifically the method for listening to the InAppBrowser) are based on Nic Raboy’s ng2-cordova-oauth library. This library provides a range of OAuth solutions for Angular 2 in general and is an excellent utility. I wanted to add a standalone implementation of the Dropbox OAuth process for this tutorial, though, since the code for implementing one specific solution is quite a lot simpler, and since it is specific to Ionic 2 we can also use Ionic Native.
This code starts out by creating a Promise. Promises are great for code that is asynchronous (meaning that it takes some time to execute, and the results aren’t available right away). This allows us to listen for when the promise has finished, and then do something. Inside of a promise it can either resolve which means it has been successful, or reject which means it has been unsuccessful. You will see how we handle these scenarios when we make use of the login function later.
Inside of the promise, we launch the InAppBrowser and send the user to the URL we created based on the App Key and Redirect URI. We also create a reference to the browser we have launched so that we can see what is happening as the user progresses through the OAuth flow.
We listen for the loadstart event which will tell us when the user has been sent to a new URL. This is how we can tell when the OAuth process is complete, because once it has been completed they are redirected to our Redirect URI, http://localhost, except that it will also have a couple extra parameters on the URL, including the access token we want (assuming the user allows access). We grab that token, set it as the accessToken in the provider, and then resolve the promise.
In any other case we know something went wrong, so we reject the promise.
4. Create a Login Page
Next up, we are going to create the Login page that will call the login function we just created in our Dropbox provider.
Run the following command to generate a Login page:
ionic g page LoginPage
Since we are adding a new page, we will need to make sure to include it in the app.module.ts file.
Modify src/app/app.module.ts to reflect the following:
import { BrowserModule } from '@angular/platform-browser';
import { NgModule, ErrorHandler } from '@angular/core';
import { HttpModule } from '@angular/http';
import { IonicApp, IonicErrorHandler, IonicModule } from 'ionic-angular';
import { SplashScreen } from '@ionic-native/splash-screen';
import { StatusBar } from '@ionic-native/status-bar';
import { InAppBrowser } from '@ionic-native/in-app-browser';

import { MyApp } from './app.component';
import { HomePage } from '../pages/home/home';
import { LoginPage } from '../pages/login-page/login-page';
import { Dropbox } from '../providers/dropbox/dropbox';

@NgModule({
  declarations: [MyApp, HomePage, LoginPage],
  imports: [BrowserModule, HttpModule, IonicModule.forRoot(MyApp)],
  bootstrap: [IonicApp],
  entryComponents: [MyApp, HomePage, LoginPage],
  providers: [
    Dropbox,
    StatusBar,
    SplashScreen,
    InAppBrowser,
    { provide: ErrorHandler, useClass: IonicErrorHandler },
  ],
})
export class AppModule {}
We’re going to create a really simple template for this page, it’s just going to contain a single button to trigger the authentication process.
Modify src/pages/login-page/login-page.html to reflect the following:
<ion-header>
  <ion-navbar color="primary">
    <ion-title>Login</ion-title>
  </ion-navbar>
</ion-header>

<ion-content>
  <button ion-button color="primary" (click)="login()">
    Authenticate with Dropbox
  </button>
</ion-content>
We’ve added a (click) handler here that will trigger the login function. Keep in mind that this is not the login function that we defined in the Dropbox provider, it will trigger the login function in the login-page.ts file, which we are about to define now:
Modify src/pages/login-page/login-page.ts to reflect the following:
import { Component } from '@angular/core';
import { NavController, LoadingController } from 'ionic-angular';
import { HomePage } from '../home/home';
import { Dropbox } from '../../providers/dropbox';

@Component({
  selector: 'login-page',
  templateUrl: 'login-page.html'
})
export class LoginPage {

  constructor(public navCtrl: NavController, public dropbox: Dropbox) {

  }

  login() {

    this.dropbox.login().then((success) => {
      this.navCtrl.setRoot(HomePage);
    }, (err) => {
      console.log(err);
    });

  }

}
We’ve imported and set up a reference to the Dropbox provider here, but note that we have not declared it as a provider in the decorator. This is because we will be adding the provider declaration to the app.js file later (which is app-wide, so we only need to declare it once).
The login function here has the simple task of calling the login method in the provider. We are making using of the promise this function returns by defining what we want to happen when it resolves (success) or rejects (err). In the success scenario, we simply change to the normal home page, since the user is authenticated and ready to start pulling in from Dropbox.
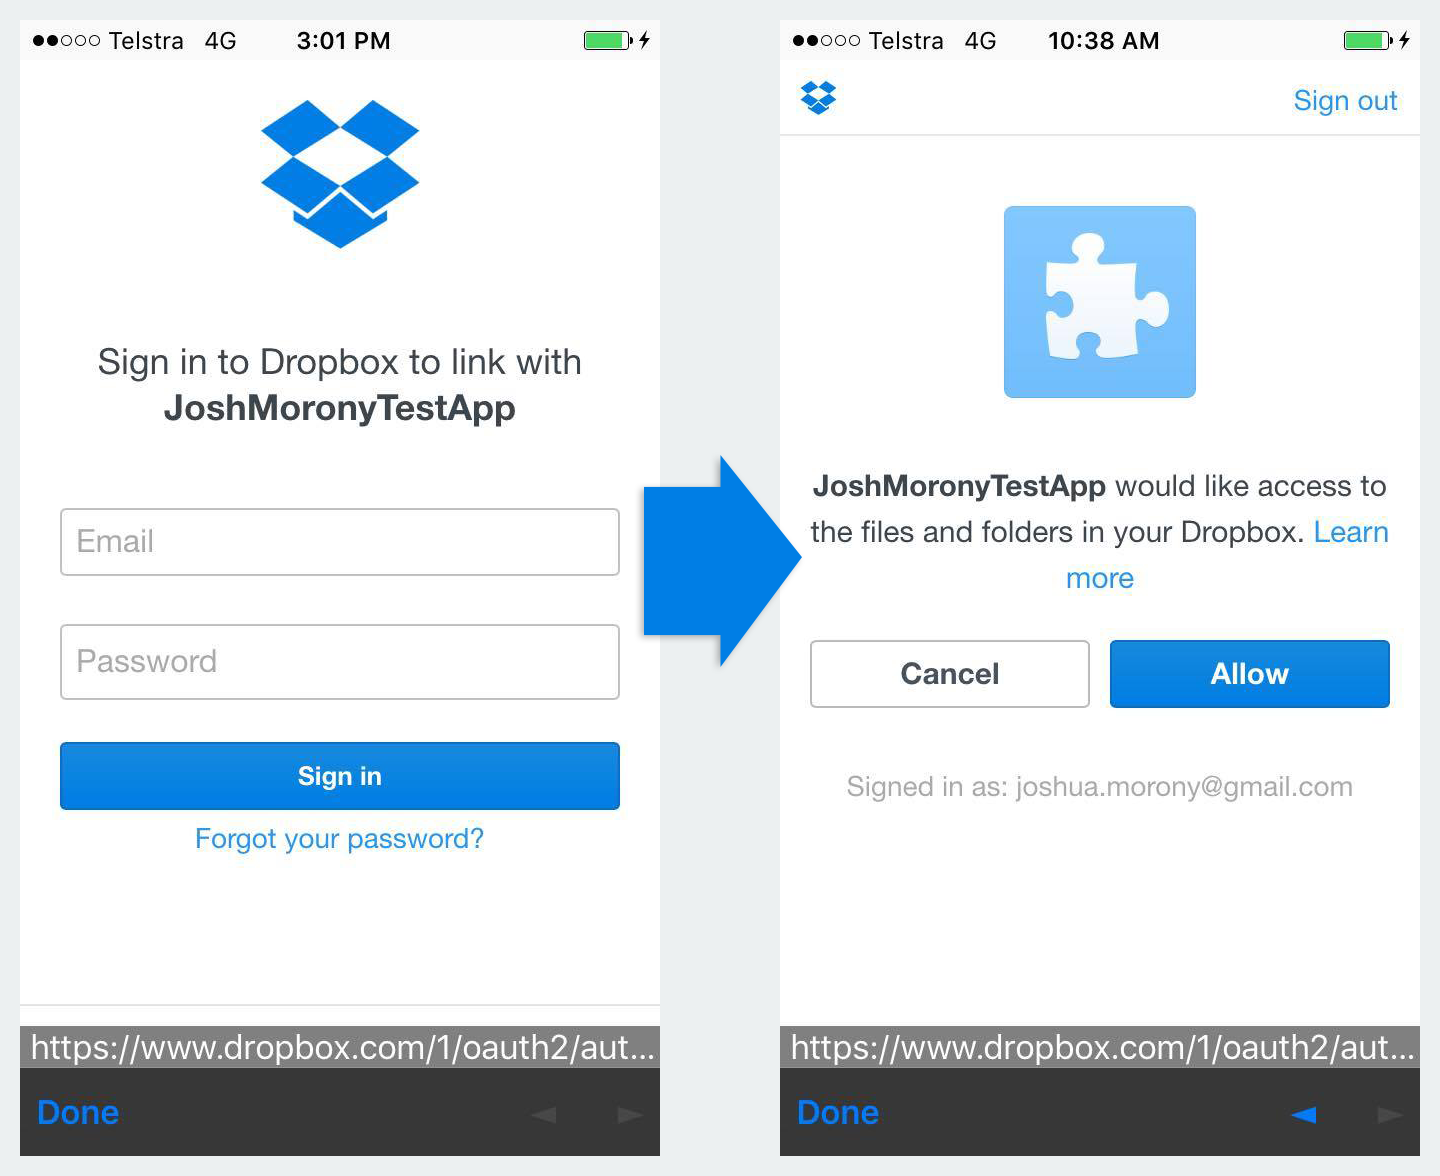
When this login process is triggered, the user will go through a couple of screens to authenticate that will look something like this:
5. Modify the Home Page
Since we are not waiting on the user to authenticate rather than manually setting the access token, we are going to make some changes to the ionViewDidLoad function and we are also going to make use of the ionViewDidEnter function, which will trigger whenever a user changes to that page.
Modify
ionViewDidLoadin src/pages/home/home.ts to reflect the following:
ionViewDidLoad(){

      this.folders = [];

      let loading = this.loadingCtrl.create({
        content: 'Syncing from Dropbox...'
      });

      loading.present();

      this.dropbox.getFolders().subscribe(data => {
        this.folders = data.entries;
        loading.dismiss();
      }, (err) => {
        console.log(err);
      });

  }
Add the following function to src/pages/home/home.ts:
ionViewDidEnter(){

    let loading = this.loadingCtrl.create({
      content: 'Syncing from Dropbox...'
    });

    loading.present();

    this.dropbox.getFolders().subscribe(data => {
      this.folders = data.entries;
      loading.dismiss();
    }, (err) => {
      console.log(err);
    });

  }
Now everything will work just as it did before, except that it will make use of the authenticated users access token.
6. Other Modifications
There are just a few more modifications we’re going to need to make. First of all, we are going to add in a Content Security Policy tag to our index.html file to ensure that all of our resources can load in properly.
Modify src/index.html to include the following tag:
<meta
  http-equiv="Content-Security-Policy"
  content="font-src 'self' data:; img-src * data:; default-src * 'unsafe-eval' 'unsafe-inline'"
/>
We are also going to need to set the login page as the root page inside of our root component now.
Modify app.component.ts to reflect the following:
import { Component } from '@angular/core';
import { Platform } from 'ionic-angular';
import { StatusBar } from '@ionic-native/status-bar';
import { SplashScreen } from '@ionic-native/splash-screen';
import { LoginPage } from '../pages/login-page/login-page';

@Component({
  template: `<ion-nav [root]="rootPage"></ion-nav>`,
})
export class MyApp {
  rootPage = LoginPage;

  constructor(
    platform: Platform,
    statusBar: StatusBar,
    splashScreen: SplashScreen
  ) {
    platform.ready().then(() => {
      statusBar.styleDefault();
      splashScreen.hide();
    });
  }
}
Notice that we have removed the Home page import and replaced it with the Login page, as well as setting the rootPage to LoginPage. Now users will first be directed to the login page, and only once they have successfully authenticated will they be redirected to the main part of the application.
Summary
That’s it! Remember that we are using a native plugin now so you won’t be able to test the login flow through the browser, you will need to either run it on a physical device or through an emulator.
I think that Part 1 and Part 2 of this tutorial cover the core principles of how to integrate Dropbox into your Ionic 2 applications, but if you would like to see this extended into other areas let me know. If there’s enough demand I’ll make a Part 3.