

In the last tutorial we discussed some strategies for creating a multi-user app with PouchDB and CouchDB, specifically in the relation to the todo application created in this tutorial. If you are unfamiliar with PouchDB and CouchDB I would recommend reading this post before going any further. In short, PouchDB is used to store data locally and can sync with a remote CouchDB database, which provides two way replication (any changes to either data store will be available instantly everywhere) and support for offline data that syncs when online.
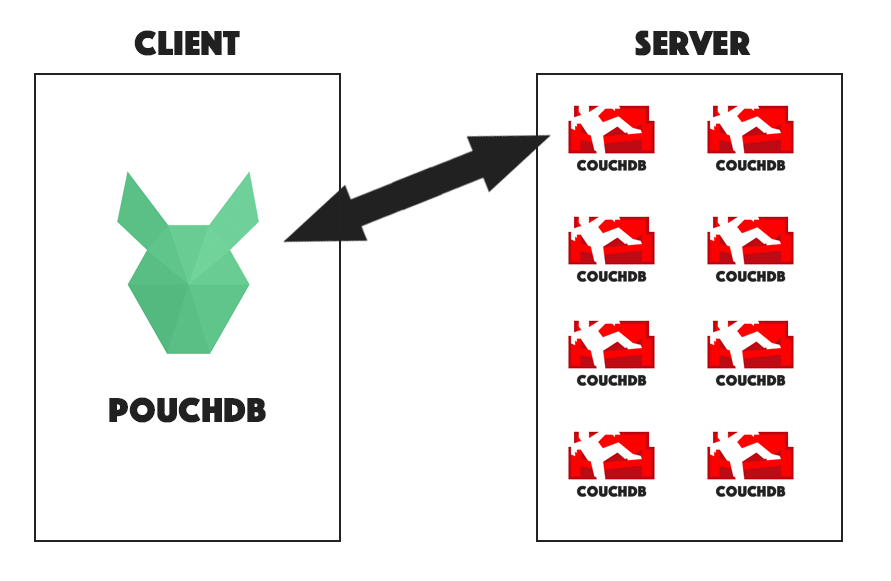
There was a lot to consider in the last tutorial, but in the end we decided that the best structure for turning the single user todo application into a multi user one was to provide each user with their own remote CouchDB database that will sync to their local database. This would look something like this:
In theory, it sounds pretty straightforward, but we didn’t get into how to actually implement it. In this tutorial we are going to extend the cloud based todo application that was created previously with Ionic 2, to support multiple users and authentication. We will be using the SuperLogin package to handle authentication for us, as well as setting up secure databases for each user that signs up in the app. In the last tutorial I mentioned security issues that would need to be handled to prevent one user from accessing another user’s data, and (assuming you’ve disabled the admin party in CouchDB) SuperLogin will handle this for us.
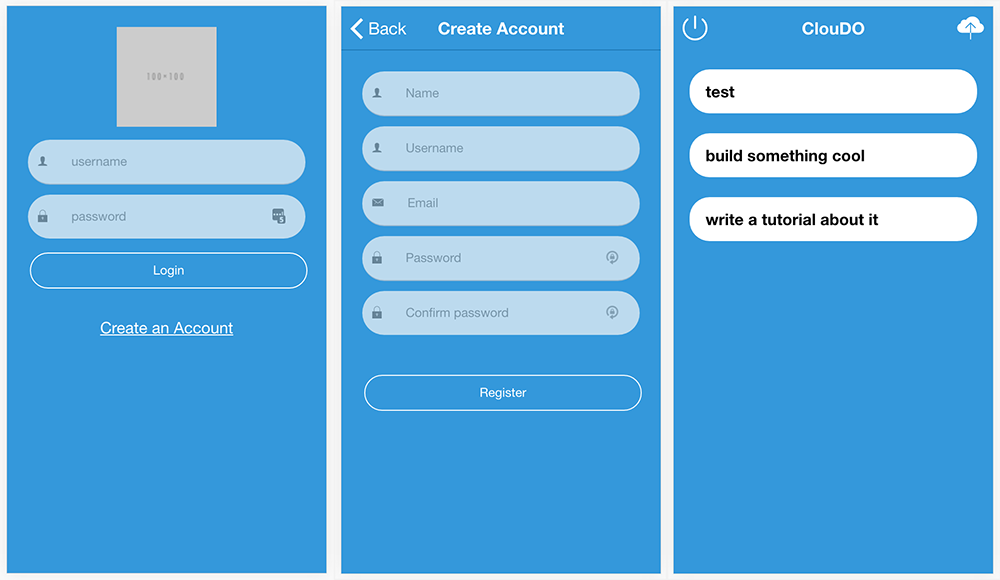
At the end of this tutorial our application should look something like this:
Before We Get Started
Before you go through this tutorial, you should have at least a basic understanding of Ionic 2 concepts. You must also already have Ionic 2 set up on your machine.
If you’re not familiar with Ionic 2 already, I’d recommend reading my Ionic 2 Beginners Guide first to get up and running and understand the basic concepts. If you want a much more detailed guide for learning Ionic 2, then take a look at Building Mobile Apps with Ionic 2.
It’s also important that you read these tutorials before continuing:
- Offline Syncing in Ionic 2 with PouchDB & CouchDB
- Creating a Multiple User App with PouchDB & CouchDB
The first tutorial walks through setting up CouchDB and building the original single user todo application, and the second covers the theory behind the solution we will be implementing today. If you’re short on time it is not absolutely necessary to read these tutorials, as I will quickly run through all the code you need to get up to speed in the next section, but it will lack a lot of the instruction and context the original tutorial provides.
1. Generate a New Application
Let’s start off by creating a new Ionic 2 application.
Generate a new application with the following command:
ionic start cloudo-auth blank --v2Run the following command to switch to your project once it has generated:
cd cloudo-authWe’ll be using a few pages and a provider in this tutorial, so let’s also generate those now.
Run the following commands to generate the necessary files for the project:
ionic g page Loginionic g page Signupionic g provider TodosWe’re not going to get too much into the styling with this application, but we are going to just set up some basic colours now.
Modify the $colors map in src/theme/variables.scss to reflect the following:
$colors: (
  primary: #95a5a6,
  secondary: #3498db,
  danger: #f53d3d,
  light: #f4f4f4,
  dark: #222,
  favorite: #69bb7b
);
Since we will be making use of PouchDB, we will need to install that in the project.
Run the following commands to install PouchDB:
npm install pouchdb --saveand to make sure that the TypeScript compiler doesn’t complain about not knowing what PouchDB is, we will need to install the types for PouchDB:
Run the following command to install the types for PouchDB
npm install @types/pouchdb --save --save-exactFinally, we are going to have to set up the pages and the provider we generated in the app.module.ts file.
Modify src/app/app.module.ts to reflect the following:
import { NgModule, ErrorHandler } from '@angular/core';
import { IonicApp, IonicModule, IonicErrorHandler } from 'ionic-angular';
import { MyApp } from './app.component';
import { HomePage } from '../pages/home/home';
import { LoginPage } from '../pages/login/login';
import { SignupPage } from '../pages/signup/signup';
import { Todos } from '../providers/todos';

@NgModule({
  declarations: [MyApp, HomePage, LoginPage, SignupPage],
  imports: [IonicModule.forRoot(MyApp)],
  bootstrap: [IonicApp],
  entryComponents: [MyApp, HomePage, LoginPage, SignupPage],
  providers: [{ provide: ErrorHandler, useClass: IonicErrorHandler }, Todos],
})
export class AppModule {}
2. Create the Pages
Now we’re going to start implementing our pages. I’m going to go through this pretty quickly because they are just basic pages with some forms and buttons and so on. If you’re after some more details explanations of everything, I would recommend checking out the resources in this post.
If you haven’t already created the Cloudo application from the previous tutorial, I am going to run through the code you will need to set up, so it’s not a requirement that you complete the other tutorial first (again, I’d recommend it though). Even if you have completed the previous tutorial, make sure you look through these snippets as well because there are a few minor changes I’ve made.
For now, we will only be implementing the templates – we will handle all the logic later.
Modify src/pages/login/login.html to reflect the following:
<ion-content padding>
  <ion-row class="login-logo">
    <ion-col><img src="http://placehold.it/100x100" /></ion-col>
  </ion-row>

  <ion-row class="login-form">
    <ion-col>
      <ion-list inset>
        <ion-item>
          <ion-label><ion-icon name="person"></ion-icon></ion-label>
          <ion-input
            [(ngModel)]="username"
            placeholder="username"
            type="text"
          ></ion-input>
        </ion-item>

        <ion-item>
          <ion-label><ion-icon name="lock"></ion-icon></ion-label>
          <ion-input
            [(ngModel)]="password"
            placeholder="password"
            type="password"
          ></ion-input>
        </ion-item>
      </ion-list>

      <button ion-button (click)="login()" primary class="login-button">
        Login
      </button>
    </ion-col>
  </ion-row>

  <ion-row>
    <ion-col>
      <button (click)="launchSignup()" class="create-account">
        Create an Account
      </button>
    </ion-col>
  </ion-row>
</ion-content>
Modify login.scss to reflect the following:
.ios,
.md {
  page-login {
    .scroll-content {
      background-color: map-get($colors, secondary);
      display: flex;
      flex-direction: column;
    }

    ion-row {
      align-items: center;
      text-align: center;
    }

    ion-item {
      border-radius: 30px !important;
      padding-left: 10px !important;
      margin-bottom: 10px;
      background-color: #f6f6f6;
      opacity: 0.7;
      font-size: 0.9em;
    }

    ion-list {
      margin: 0;
    }

    .login-logo {
      flex: 2;
    }

    .login-form {
      flex: 1;
    }

    .create-account {
      color: #fff;
      text-decoration: underline;
      background: none;
    }

    .login-button {
      width: 100%;
      border-radius: 30px;
      font-size: 0.9em;
      background-color: transparent;
      border: 1px solid #fff;
    }
  }
}
With the above changes we have created a simple login form which will serve as the initial root page for our application. It just contains a username and password field that the user will use to log in, as well as a Create Account button that will eventually take them to the signup page.
We’ve added some styling, and since it isn’t really the goal of this tutorial I’m not going to talk through those in detail, however, I wanted to point out a couple of things that might seem peculiar to some people. We have wrapped all the styles with the page-login selector so that this styling only affects the login page. We have also used this syntax:
background-color: map-get($colors, secondary);which allows us to grab the secondary colour that is defined in the variables.scss file, rather than defining it manually. This makes the app much more easily customisable. Now let’s move on to the signup page.
Modify signup.html to reflect the following:
<ion-header>
  <ion-navbar color="secondary">
    <ion-title>Create Account</ion-title>
  </ion-navbar>
</ion-header>

<ion-content padding>
  <ion-row class="account-form">
    <ion-col>
      <ion-list inset>
        <ion-item>
          <ion-label><ion-icon name="person"></ion-icon></ion-label>
          <ion-input
            [(ngModel)]="name"
            placeholder="Name"
            type="text"
          ></ion-input>
        </ion-item>

        <ion-item>
          <ion-label><ion-icon name="person"></ion-icon></ion-label>
          <ion-input
            [(ngModel)]="username"
            placeholder="Username"
            type="text"
          ></ion-input>
        </ion-item>

        <ion-item>
          <ion-label><ion-icon name="mail"></ion-icon></ion-label>
          <ion-input
            [(ngModel)]="email"
            placeholder="Email"
            type="email"
          ></ion-input>
        </ion-item>

        <ion-item>
          <ion-label><ion-icon name="lock"></ion-icon></ion-label>
          <ion-input
            [(ngModel)]="password"
            placeholder="Password"
            type="password"
          ></ion-input>
        </ion-item>

        <ion-item>
          <ion-label><ion-icon name="lock"></ion-icon></ion-label>
          <ion-input
            [(ngModel)]="confirmPassword"
            placeholder="Confirm password"
            type="password"
          ></ion-input>
        </ion-item>
      </ion-list>

      <button ion-button (click)="register()" class="continue-button">
        Register
      </button>
    </ion-col>
  </ion-row>
</ion-content>
Modify signup.scss to reflect the following:
.ios,
.md {
  page-signup {
    .scroll-content {
      background-color: map-get($colors, secondary);
      display: flex;
      flex-direction: column;
    }

    ion-item {
      border-radius: 30px !important;
      padding-left: 10px !important;
      margin-bottom: 10px;
      background-color: #f6f6f6;
      opacity: 0.7;
      font-size: 0.9em;
    }

    ion-list {
      margin: 0;
    }

    .heading-text {
      flex: 1;
      align-items: center;
      text-align: center;
    }

    .heading-text h3 {
      color: #fff;
    }

    .account-form {
      flex: 1;
    }

    .continue-button {
      width: 100%;
      border-radius: 30px;
      margin-top: 30px;
      font-size: 0.9em;
      background-color: transparent;
      border: 1px solid #fff;
    }
  }
}
This is pretty much the same as the login page, except we have a few more fields since this will be handling the signup process.
Modify home.html to reflect the following:
<ion-header no-border>
  <ion-navbar color="secondary">
    <ion-title> ClouDO </ion-title>
    <ion-buttons start>
      <button ion-button icon-only (click)="logout()">
        <ion-icon name="power"></ion-icon>
      </button>
    </ion-buttons>
    <ion-buttons end>
      <button ion-button icon-only (click)="createTodo()">
        <ion-icon name="cloud-upload"></ion-icon>
      </button>
    </ion-buttons>
  </ion-navbar>
</ion-header>

<ion-content>
  <ion-list no-lines>
    <ion-item-sliding *ngFor="let todo of todos">
      <ion-item> {{todo.title}} </ion-item>

      <ion-item-options>
        <button ion-button icon-only color="light" (click)="updateTodo(todo)">
          <ion-icon name="create"></ion-icon>
        </button>
        <button ion-button icon-only color="primary" (click)="deleteTodo(todo)">
          <ion-icon name="checkmark"></ion-icon>
        </button>
      </ion-item-options>
    </ion-item-sliding>
  </ion-list>
</ion-content>
Modify home.scss to reflect the following:
page-home {
  .scroll-content {
    background-color: map-get($colors, secondary);
    display: flex !important;
    justify-content: center;
  }

  ion-list {
    width: 90%;
  }

  ion-item-sliding {
    margin-top: 20px;
    border-radius: 20px;
  }

  ion-item {
    border: none !important;
    font-weight: bold !important;
  }
}
This is the page for the main part of our application, that will display all of the todos for a user, as well as allow them to create new todos, modify them, and delete them. If you’d like more information on how this all works, I recommend taking a look at the original tutorial.
3. Create the Server
In the last tutorial we just had our PouchDB syncing to the remote CouchDB database with nothing in between. This is still going to be the case, but we are going to need to add a server in now so that we can make calls to it for our signup and authentication. The SuperLogin package is going to do all of the heavy lifting for us here – it handles registration, authentication, setting up private databases for users and a whole lot more we won’t be making use of. We just need to set up a basic NodeJS server and include it.
I’m going to assume you already know what a NodeJS server is, so I’m not going to explain a lot of what is in the file we are about to create. However, if you would like some more background I’d recommend taking a look at a previous tutorial where we built a REST API with NodeJS that made use of MongoDB.
In order to set up the server, you will need to create a new folder outside of your Ionic 2 project to contain it. Typically, people will create a project with new folders: a client folder to contain the front end (the Ionic 2 project) and a server folder to contain the server. You may use that structure if you like.
Create a server folder outside of your Ionic 2 project
Create a file called package.json inside of the server folder, and add the following:
{
  "name": "cloudo-auth",
  "version": "0.1.0",
  "description": "A sample Node.js app using Express 4",
  "engines": {
    "node": "5.9.1"
  },
  "main": "server.js",
  "scripts": {
    "start": "node server.js"
  },
  "dependencies": {
    "body-parser": "^1.15.2",
    "cors": "^2.8.0",
    "del": "2.2.0",
    "express": "^4.14.0",
    "http": "0.0.0",
    "method-override": "^2.3.6",
    "morgan": "^1.7.0",
    "superlogin": "^0.6.1"
  }
}
This defines all of the dependencies that our server will require, and it also defines the file that should be used to start the server (which we will create in a moment).
Once you have that file created, you will need to run another command to install all of the dependences.
Switch to the **server* folder, and then run the following command:
npm installNow that we have everything set up, we can start implementing the server logic.
Create a file called server.js inside of the **server* folder and add the following to it with the following:
var express = require('express');
var http = require('http');
var bodyParser = require('body-parser');
var logger = require('morgan');
var cors = require('cors');
var SuperLogin = require('superlogin');

var app = express();
app.set('port', process.env.PORT || 3000);
app.use(logger('dev'));
app.use(bodyParser.json());
app.use(bodyParser.urlencoded({ extended: false }));
app.use(cors());

app.use(function (req, res, next) {
  res.header('Access-Control-Allow-Origin', '*');
  res.header('Access-Control-Allow-Methods', 'DELETE, PUT');
  res.header(
    'Access-Control-Allow-Headers',
    'Origin, X-Requested-With, Content-Type, Accept'
  );
  next();
});

var config = {
  dbServer: {
    protocol: 'http://',
    host: 'localhost:5984',
    user: '',
    password: '',
    userDB: 'sl-users',
    couchAuthDB: '_users',
  },
  mailer: {
    fromEmail: 'gmail.user@gmail.com',
    options: {
      service: 'Gmail',
      auth: {
        user: 'gmail.user@gmail.com',
        pass: 'userpass',
      },
    },
  },
  security: {
    maxFailedLogins: 3,
    lockoutTime: 600,
    tokenLife: 86400,
    loginOnRegistration: true,
  },
  userDBs: {
    defaultDBs: {
      private: ['supertest'],
    },
    model: {
      supertest: {
        permissions: ['_reader', '_writer', '_replicator'],
      },
    },
  },
  providers: {
    local: true,
  },
};

// Initialize SuperLogin
var superlogin = new SuperLogin(config);

// Mount SuperLogin's routes to our app
app.use('/auth', superlogin.router);

app.listen(app.get('port'));
console.log('App listening on ' + app.get('port'));
This is mostly the same as the server we created for the MongoDB REST API, with the main difference being we are including SuperLogin. First, we set up the following configuration for SuperLogin:
var config = {
  dbServer: {
    protocol: 'http://',
    host: 'localhost:5984',
    user: '',
    password: '',
    userDB: 'sl-users',
    couchAuthDB: '_users',
  },
  mailer: {
    fromEmail: 'gmail.user@gmail.com',
    options: {
      service: 'Gmail',
      auth: {
        user: 'gmail.user@gmail.com',
        pass: 'userpass',
      },
    },
  },
  security: {
    maxFailedLogins: 3,
    lockoutTime: 600,
    tokenLife: 86400,
    loginOnRegistration: true,
  },
  userDBs: {
    defaultDBs: {
      private: ['supertest'],
    },
  },
  providers: {
    local: true,
  },
};
This config object is used to intialise SuperLogin, and contains various settings that we can change. The most important one here is this:
host: 'localhost:5984',you need to make sure this is the address of the CouchDB instance that is running on your machine (or remotely). If you have not already set up CouchDB, go back to the original tutorial for instructions on how to do that.
We have the configuration for the mailer set up here which is what will be used when sending confirmation emails, forgot password emails and so on (yes, SuperLogin even handles that!). You will need to configure this for whatever service you are using though, this tutorial does not actually make use of this feature.
Next we have the security settings, which are pretty self explanatory, but we have also enabled loginOnRegistration. This will cause a user to automatically be authenticated when they signup so that we can direct them straight to the main application, rather than having them login after they sign up.
The userDBs section defines the databases that will be created. We simply have a single private database called supertest, which means that each user that signs up will be given their own private database, which will be created in the following format:

although we haven’t made user of it here, you can also tell SuperLogin to create a shared database that will allow access to more than one user.
There’s a ton more configurations you can supply, including things like Facebook integration, so I’d recommend taking a look at the documentation. We will be leaving it there for now though.
The other important part here is these lines:
// Initialize SuperLogin
var superlogin = new SuperLogin(config);

// Mount SuperLogin's routes to our app
app.use('/auth', superlogin.router);
This uses our configuration settings and sets up all of the SuperLogin routes on /auth, meaning we don’t need to set them all up manually like we did in the MongoDB application. Now we will be able to make HTTP requests to URLs like /auth/login and /auth/register from within our application to make use if the SuperLogin functionality.
Now that our server is created, all you have to do is navigate to it in your terminal and run the following command to start the server:
node server.js
and you should see something like this:

4. Create the Todos Provider
Now let’s set up our Todos provider, which handles saving and loading our todos. We mostly covered everything that is happening in this provider in the original tutorial, but there are some minor changes.
Modify src/providers/todos.ts to reflect the following:
import { Injectable } from '@angular/core';
import PouchDB from 'pouchdb';

@Injectable()
export class Todos {
  data: any;
  db: any;
  remote: any;

  constructor() {}

  init(details) {
    this.db = new PouchDB('cloudo');

    this.remote = details.userDBs.supertest;

    let options = {
      live: true,
      retry: true,
      continuous: true,
    };

    this.db.sync(this.remote, options);

    console.log(this.db);
  }

  logout() {
    this.data = null;

    this.db.destroy().then(() => {
      console.log('database removed');
    });
  }

  getTodos() {
    if (this.data) {
      return Promise.resolve(this.data);
    }

    return new Promise((resolve) => {
      this.db
        .allDocs({
          include_docs: true,
        })
        .then((result) => {
          this.data = [];

          let docs = result.rows.map((row) => {
            this.data.push(row.doc);
          });

          resolve(this.data);

          this.db
            .changes({ live: true, since: 'now', include_docs: true })
            .on('change', (change) => {
              this.handleChange(change);
            });
        })
        .catch((error) => {
          console.log(error);
        });
    });
  }

  createTodo(todo) {
    this.db.post(todo);
  }

  updateTodo(todo) {
    this.db.put(todo).catch((err) => {
      console.log(err);
    });
  }

  deleteTodo(todo) {
    this.db.remove(todo).catch((err) => {
      console.log(err);
    });
  }

  handleChange(change) {
    let changedDoc = null;
    let changedIndex = null;

    this.data.forEach((doc, index) => {
      if (doc._id === change.id) {
        changedDoc = doc;
        changedIndex = index;
      }
    });

    //A document was deleted
    if (change.deleted) {
      this.data.splice(changedIndex, 1);
    } else {
      //A document was updated
      if (changedDoc) {
        this.data[changedIndex] = change.doc;
      }

      //A document was added
      else {
        this.data.push(change.doc);
      }
    }
  }
}
If you’ve got a keen eye then you might notice that this provider has been modified slightly when compared to the original provider from the last tutorial. Instead of immediately initialising PouchDB, we have moved it into its own init function. This function takes in the users authentication details, and then syncs the local instance of PouchDB to the appropriate remote CouchDB database (which is their own private database).
We also have a logout function that removes all of the data from memory and destroys the local database.
5. Implement Login and Signup
We’ve got most of the app set up, now we just need to implement the logic for the integration with SuperLogin. We will need to make some modifications to all three of the pages in the application, and I will talk through those as we go.
Modify login.ts to reflect the following:
import { Component } from '@angular/core';
import { Http, Headers } from '@angular/http';
import { NavController } from 'ionic-angular';
import { SignupPage } from '../signup/signup';
import { HomePage } from '../home/home';
import { Todos } from '../../providers/todos';

@Component({
  selector: 'page-login',
  templateUrl: 'login.html'
})
export class LoginPage {

  username: string;
  password: string;

  constructor(public nav: NavController, public http: Http, public todoService: Todos) {

  }

  login(){

      let headers = new Headers();
      headers.append('Content-Type', 'application/json');

      let credentials = {
        username: this.username,
        password: this.password
      };

      this.http.post('http://localhost:3000/auth/login', JSON.stringify(credentials), {headers: headers})
        .subscribe(res => {
          this.todoService.init(res.json());
          this.nav.setRoot(HomePage);
        }, (err) => {
          console.log(err);
        });

  }

  launchSignup(){
    this.nav.push(SignupPage);
  }

}
For our login page we need to implement the login() function that is called when the user clicks the “Login” button. This takes the credentials they entered and then POSTs to the auth/login route on our serve. SuperLogin will do its magic, and if the users credentials are correct we will get a success response back which will contain information about the user, including the URL for their own private CouchDB database. We make a call to the Todos provider to initialise it with that data, and then change the root page to the Home page, which is the main page of the application.
We have also implemented the launchSignup function here which simply pushes the Signup page if the user clicks the ‘Create Account’ button.
Modify signup.ts to reflect the following:
import { Component } from '@angular/core';
import { Http, Headers } from '@angular/http';
import { NavController } from 'ionic-angular';
import { HomePage } from '../home/home';
import { Todos } from '../../providers/todos';

@Component({
  selector: 'page-signup',
  templateUrl: 'signup.html'
})
export class SignupPage {

  name: string;
  username: string;
  email: string;
  password: string;
  confirmPassword: string;

  constructor(public nav: NavController, public http: Http, public todoService: Todos) {

  }

  register(){

      let headers = new Headers();
      headers.append('Content-Type', 'application/json');

      let user = {
        name: this.name,
        username: this.username,
        email: this.email,
        password: this.password,
        confirmPassword: this.confirmPassword
      };

      this.http.post('http://localhost:3000/auth/register', JSON.stringify(user), {headers: headers})
        .subscribe(res => {
          this.todoService.init(res.json());
          this.nav.setRoot(HomePage);
        }, (err) => {
          console.log(err);
        });

  }

}
This is almost exactly the same as the login page, except this time we post to the /auth/register URL instead. We still initialise the Todos service with the returned data, and again we change the root page to the home page. Remember how we set the loginOnRegistration configuration to true in our server? This is important because if we didn’t do that, the user wouldn’t be logged in when we send them to the Home page here.
Modify home.ts to reflect the following:
import { Component } from "@angular/core";
import { NavController, AlertController } from 'ionic-angular';
import { Todos } from '../../providers/todos';
import { LoginPage } from '../login/login';

@Component({
  selector: 'page-home',
  templateUrl: 'home.html'
})
export class HomePage {

  todos: any;

  constructor(public nav: NavController, public todoService: Todos, public alertCtrl: AlertController) {

  }

  ionViewDidLoad(){

    this.todoService.getTodos().then((data) => {
      this.todos = data;
    });

  }

  logout(){
    this.todoService.logout();
    this.todos = null;
    this.nav.setRoot(LoginPage);
  }

  createTodo(){

    let prompt = this.alertCtrl.create({
      title: 'Add',
      message: 'What do you need to do?',
      inputs: [
        {
          name: 'title'
        }
      ],
      buttons: [
        {
          text: 'Cancel'
        },
        {
          text: 'Save',
          handler: data => {
            this.todoService.createTodo({title: data.title});
          }
        }
      ]
    });

    prompt.present();

  }

  updateTodo(todo){

    let prompt = this.alertCtrl.create({
      title: 'Edit',
      message: 'Change your mind?',
      inputs: [
        {
          name: 'title'
        }
      ],
      buttons: [
        {
          text: 'Cancel'
        },
        {
          text: 'Save',
          handler: data => {
            this.todoService.updateTodo({
              _id: todo._id,
              _rev: todo._rev,
              title: data.title
            });
          }
        }
      ]
    });

    prompt.present();
  }

  deleteTodo(todo){
    this.todoService.deleteTodo(todo);
  }

}
There isn’t really much difference here when compared to the original version of this tutorial, except that we have implemented the logout function that will call the logout method in the Todos service, clear the data, and send the user back to the login page.
Finally, we are going to need to modify the root component so that the Login page is the first page to display, rather than the home page.
Modify src/app/app.component.ts to reflect the following:
import { Component } from '@angular/core';
import { Platform } from 'ionic-angular';
import { StatusBar, Splashscreen } from 'ionic-native';
import { LoginPage } from '../pages/login/login';

@Component({
  templateUrl: 'app.html',
})
export class MyApp {
  rootPage = LoginPage;

  constructor(platform: Platform) {
    platform.ready().then(() => {
      // Okay, so the platform is ready and our plugins are available.
      // Here you can do any higher level native things you might need.
      StatusBar.styleDefault();
      Splashscreen.hide();
    });
  }
}
6. Run the Server and Test
That’s it, we’re done! All you have to do now is make sure your server is running by navigating to the server folder and running:
node server.js
and then serving your application with:
ionic serve
Go ahead and create a new account, post some todos, logout, login, create a new account and do it all again. Hopefully, you should find you can use many different accounts independently of each other.
Summary
Creating a login system is no small technical challenge, we have to consider many requirements including:
- Login
- Registration
- Forgot passwords
- Security
- Emails
- Social registration
among many more. SuperLogin simplifies all of this greatly (to the point where you really don’t even need to do much at all). I hope these tutorials have highlighted just how useful this package can be, how powerful (but also complex) PouchDB and CouchDB are when used together, and how to build a practical, real world scenario application reasonably simply. For the amount we are doing with this application, the code base is surprisingly small and simple.