
Notifications are an excellent way to engage your users or to get them to go back to your application. You can also use notifications to make users pay attention to something while they're using the app.
There are two types of notifications:
- Push Notifications
- Local Notifications
As the title of this article suggests, we won’t be focusing on Push notifications (also because it is something that has been documented heavily). Instead, we will only focus on local notifications. The difference between the two stems from one major point:
Local notifications originate from the application itself, as opposed to Push notifications which are triggered from a remote server.
For this article, we will be using the vanilla project that is created when you open a new Flutter application (the one with the counter) – minus all the related counter bits.
As of writing this article, the latest version of Flutter is 5.0.0+1, so for any future readers, please bear this in mind.
Setup the Project
To allow our application to use local notifications, we need to add the flutter_local_notifications package to our project.
Add the following to your pubspec.yaml file, under dependencies:
dependencies:
  flutter:
    sdk: flutter
flutter_local_notifications: ^5.0.0+1Then run this command:
Pub getSince the local notifications package needs to be initialized, we will be creating a service class to handle this logic for our entire application. This class will also expose methods to create/send/cancel notifications.
Create a new dart file named notification_service.dart with the following code:
import 'package:flutter_local_notifications/flutter_local_notifications.dart';

class NotificationService {
  static final NotificationService _notificationService =
      NotificationService._internal();

  factory NotificationService() {
    return _notificationService;
  }

  NotificationService._internal();

}The code above translates to a Singleton object in Dart. Make sure to import the local notification package at the top of this file.
Integration
Because Flutter is a cross platform framework, every package that is created for it needs to support both iOS and Android devices.
And because notifications are handled very differently between iOS and Android, there are several calibrations we'll need to make when using the local notifications package.
First we need to create an instance for the FlutterLocalNotificationPlugin. We will use this object to initialize settings for Android and iOS and also for other notification purposes.
final FlutterLocalNotificationsPlugin flutterLocalNotificationsPlugin = FlutterLocalNotificationsPlugin();
We now need to initialize the local notification plugin with specific settings for Android and iOS. To do so, we need to create an InitializationSettings object. It accepts arguments for the Android, iOS, and MacOS operating systems.
We won’t be discussing MacOS here as it has a similar configuration to iOS.
Android
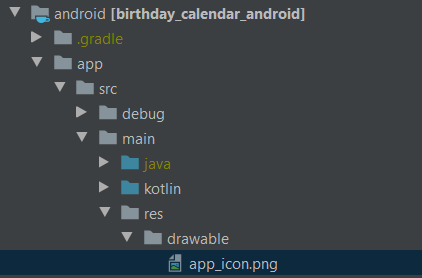
To set this up for Android it is fairly simple, as there is only one mandatory argument to pass – defaultIcon (String). It represents the icon that will be displayed in the notification.
Here you need to pass the name of the icon you want to be used. You must place this icon inside the drawable directory. The full path to it is:
YOUR_APPLICATION_NAME\android\app\src\main\res\drawable\YOUR_APP_ICON.png
There is no need to request any permissions.
iOS
As with most subjects related to iOS, things here get a bit more complicated. Because of how notifications are handled between different versions of the operating system, we need to do some extra configuration here.
Inside the AppDelegate file you need to add the following lines of code:
- (BOOL)application:(UIApplication *)application
didFinishLaunchingWithOptions:(NSDictionary<UIApplicationLaunchOptionsKey, id> *)launchOptions {
  if (@available(iOS 10.0, *)) {
    [UNUserNotificationCenter currentNotificationCenter].delegate = (id<UNUserNotificationCenterDelegate>) self;
  }
}
You need to ask permission from the user for various issues related to notifications. Therefore, the initializer object for iOS has the following arguments:
Each of them is self explanatory, but relates to a different aspect in a notification. To correspond with these permissions there are also default values you can set for each of them.
These options are there because the initialization of the local notifications plugin may cause the operating system to present permissions dialogs to the user when you don’t want them to show up. If you don’t want this behavior, you can set all of these values to false.
One more caveat in iOS has to do with the difference in behavior between notifications being presented to the user when the application is in the foreground or when it is in the background.
Out of the box, the operating system will not display a notification to the user if the application is in the foreground.
The plugin itself will take care of displaying a notification when the application is in the foreground. But below iOS10, you need to give a callback method onDidReceiveLocalNotification that will handle the user’s interaction with the notification.
After configuring specific platform initializations, its time to wrap all this logic into a method in our notification service. Our best approach here is to create an init method which will get called from our main.dart file when the application first launches.
void init() {
  final AndroidInitializationSettings initializationSettingsAndroid =
      AndroidInitializationSettings('app_icon');

  final IOSInitializationSettings initializationSettingsIOS =
      IOSInitializationSettings(
    requestSoundPermission: false,
    requestBadgePermission: false,
    requestAlertPermission: false,
    onDidReceiveLocalNotification: onDidReceiveLocalNotification,
  );

    final InitializationSettings initializationSettings =
        InitializationSettings(
            android: initializationSettingsAndroid,
            iOS: initializationSettingsIOS,
            macOS: null);
  }
Notice that after creating instances for platform specific initialization settings, we also need to create an InitializationSettings object which we pass in our platform specific initialization settings objects.
Our last step here is to call the initialize method on the FlutterLocalNotificationsPlugin object.
Besides the initialization settings from above, it also has another argument called onSelectNotification. This argument represents the callback that will be called once a notification has been tapped, and it is an optional argument. This callback has one argument called payload which will hold any data that is passed through the notification.
Future<void> init() async {
  final AndroidInitializationSettings initializationSettingsAndroid =
      AndroidInitializationSettings('app_icon');

  final IOSInitializationSettings initializationSettingsIOS =
      IOSInitializationSettings(
    requestSoundPermission: false,
    requestBadgePermission: false,
    requestAlertPermission: false,
    onDidReceiveLocalNotification: onDidReceiveLocalNotification,
  );

    final InitializationSettings initializationSettings =
        InitializationSettings(
            android: initializationSettingsAndroid,
            iOS: initializationSettingsIOS,
            macOS: null);

   await flutterLocalNotificationsPlugin.initialize(initializationSettings,
        onSelectNotification: selectNotification);
  }


   Future selectNotification(String payload) async {
      //Handle notification tapped logic here
   }
In our main.dart file, we will call the init method like this:
Future<void> main() async {
  WidgetsFlutterBinding.ensureInitialized();
  await NotificationService().init(); // <----
  runApp(MyApp());
}
Local Notification Use Cases
How to Show a Local Notification
To display a notification, you need to create an appropriate notification details instance (for Android/iOS). Each platform has its own specific arguments that need to be passed in.
const AndroidNotificationDetails androidPlatformChannelSpecifics =
    AndroidNotificationDetails(
        channelId: String,   //Required for Android 8.0 or after
        channelName: String, //Required for Android 8.0 or after
        channelDescription: String, //Required for Android 8.0 or after
        importance: Importance,
        priority: Priority
);The example above shows only several of the arguments you can pass to AndroidNotificationDetails. The full list is a lot longer and you can check it out here.
const IOSNotificationDetails iOSPlatformChannelSpecifics =
    IOSNotificationDetails(
        presentAlert: bool?,  // Present an alert when the notification is displayed and the application is in the foreground (only from iOS 10 onwards)
        presentBadge: bool?,  // Present the badge number when the notification is displayed and the application is in the foreground (only from iOS 10 onwards)
        presentSound: bool?,  // Play a sound when the notification is displayed and the application is in the foreground (only from iOS 10 onwards)
        sound: String?,  // Specifics the file path to play (only from iOS 10 onwards)
        badgeNumber: int?, // The application's icon badge number
        attachments: List<IOSNotificationAttachment>?, (only from iOS 10 onwards)
        subtitle: String?, //Secondary description  (only from iOS 10 onwards)
        threadIdentifier: String? (only from iOS 10 onwards)
);Next, we will create a NotificationDetails object and pass it our platform specific notification details object.
const NotificationDetails platformChannelSpecifics =
  NotificationDetails(android: androidPlatformChannelSpecifics);

OR

const NotificationDetails platformChannelSpecifics =
  NotificationDetails(iOS: iOSPlatformChannelSpecifics);
Then we need to call the show method of the FlutterLocalNotificationPlugin.
 await flutterLocalNotificationsPlugin.show(
    int id,
    String? title,
    String? body,
    NotificationDetails? notificationDetails,
    String? payload);
The parameters here are more self explanatory, but we will go over them anyway:
- id – the identifier of the notification. Each notification must have a unique identifier
- title – the title of the notification
- body – what we want to display as the main message of our notification
- notificationDetails – the notification details object we discussed above
- payload – the data that we want to pass with this notification so that it can be used later when the notification is tapped on and our application opens up again
An example looks like this:
await flutterLocalNotificationsPlugin.show(
        12345,
        "A Notification From My Application",
        "This notification was sent using Flutter Local Notifcations Package",
        platformChannelSpecifics,
        payload: 'data');
How to Schedule a Local Notification
Scheduling a notification requires passing in a time and date relative to the timezone of the user’s device. This is to overcome differences in time that can be caused by daylight savings.
Since the local notifications plugin already contains the timezone library, we don’t need to add any other dependency in our pubspec.yaml file. But we do need to import it to our notification service and also initialize it.
import 'package:flutter_local_notifications/flutter_local_notifications.dart';
import 'package:timezone/data/latest.dart' as tz;
import 'package:timezone/timezone.dart' as tz;


Future<void> init() async {
  final AndroidInitializationSettings initializationSettingsAndroid =
      AndroidInitializationSettings('app_icon');

  final IOSInitializationSettings initializationSettingsIOS =
      IOSInitializationSettings(
    requestSoundPermission: false,
    requestBadgePermission: false,
    requestAlertPermission: false,
    onDidReceiveLocalNotification: onDidReceiveLocalNotification,
  );

    final InitializationSettings initializationSettings =
        InitializationSettings(
            android: initializationSettingsAndroid,
            iOS: initializationSettingsIOS,
            macOS: null);

  tz.initializeTimeZones();  // <------

   await flutterLocalNotificationsPlugin.initialize(initializationSettings,
        onSelectNotification: selectNotification);
  }
To schedule a notification, we need to use the zoneSchedule method:
Future<void> zonedSchedule(
              int id,
              String? title,
              String? body,
              TZDateTime scheduledDate,
              NotificationDetails notificationDetails,
              {required UILocalNotificationDateInterpretation uiLocalNotificationDateInterpretation,
              required bool androidAllowWhileIdle,
              String? payload,
              DateTimeComponents? matchDateTimeComponents}
It has several similarities to the show method, but it has arguments that relate to when the notification should be sent. Let’s look at them one by one:
- scheduledDate – this is the parameter that tells the notification when to be sent. You can get the date today and add to it the amount of time you wish
- uiLocalNotificationDateInterpretation – used in iOS versions below 10 (for lack of support) to interpret the time as absolute time or wall clock time
- androidAllowWhileIdle – specifies if the notification should be sent even when the device is in low power idle mode
An example looks like this:
await flutterLocalNotificationsPlugin.zonedSchedule(
        12345,
        "A Notification From My App",
        "This notification is brought to you by Local Notifcations Package",
        tz.TZDateTime.now(tz.local).add(const Duration(days: 3)),
        const NotificationDetails(
            android: AndroidNotificationDetails(CHANNEL_ID, CHANNEL_NAME,
                CHANNEL_DESCRIPTION)),
        androidAllowWhileIdle: true,
        uiLocalNotificationDateInterpretation:
            UILocalNotificationDateInterpretation.absoluteTime);
  }
How to Cancel a Local Notification
When cancelling a notification you have two options:
- You can cancel a specific notification
- You can cancel all pending notifications
To cancel a specific notification, you have to use the notification id.
await flutterLocalNotificationsPlugin.cancel(NOTIFICATION_ID);
To cancel all notifications, you use the cancelAll method:
await flutterLocalNotificationsPlugin.cancelAll();
Wrapping Up
There’s a lot more that you can do with the local notification package in Flutter, and I urge you to read more about it and check out the documentation.
To see a real world example of an application using local notifications, you can head over here:

To see the source code, head over here:
 GitHub
Thanks for reading!