
Pankaj Parkar | ng-conf | Oct 2020

PWA stands for Progressive Web Apps. Most web sites could benefit from using PWA. It not only helps to improve the page load time but also provides access to native features. Several case studies found out that PWA impacted the overall user engagement and those businesses see higher conversion rates.
What is a PWA?
Websites that took all the right vitamins
A Progressive Web Application (PWA) is a type of application software delivered through the web, built using HTML, CSS, and JavaScript. It is intended to work on any platform that uses a standards-compliant browser.
Internally, a PWA uses service worker browser API to provide access to some native features. Also, it gives you an app-like feel. Cache storage is a really great feature that helps drastically improve page load time.
Getting Started with a PWA
Follow the steps below to create a PWA in Angular.
- Create an Angular application
- Add @angular/pwa package
- Understand the files added/modified by @angular/pwa package
- Run the application locally
- Deploy a PWA to production
We’re going to visit each and every step in detail.
1. Create an Angular application
We start by creating a brand new angular application. Of course, we will be using the Angular CLI.
ng new angular-pwa
The above command will create a scaffold angular application inside the angular-pwa folder. Let us navigate to the angular-pwa folder and open VSCode.
cd angular-pwa && code .

2. Add @angular/pwa package
Now we’re ready to add the @angular/pwa package.
ng add @angular/pwa
The above command triggers schematics which add and modify several files.
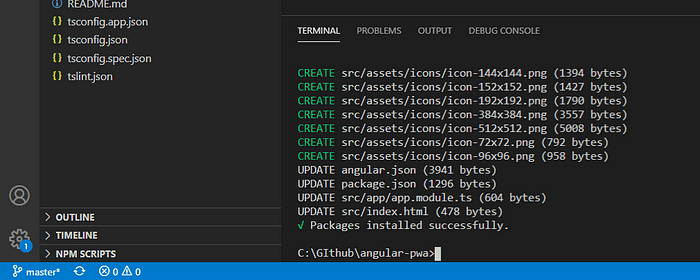
3. Understand the files added/modified by @angular/pwa package
It adds different png files for different splash images for various resolutions icon-128x128.png, icon-144x144.png, icon-152x152.png, icon-192x192.png, icon-384x384.png, icon-512x512.png. Additionally, it adds ngsw-config.json and manifest.webmanifest for configuration purposes. Also, it modifies angular.json, package.json, index.html and app.module.ts.
Changes in index.html and package.json are pretty straight forward. Let’s take a quick look at the files changes by CLI.
ngsw-config.json
It’s a configuration file in JSON format. Mainly this file is responsible for the generation of ngsw-worker.js(serviceworker.js). You don’t have to write code for that. Just set a certain configuration and you’re done. Ultimately this ngsw-worker.js helps to caches resources/assets with a specific caching strategy. As explained before, under the hood it uses service worker API.

Configurable properties in ngsw-config.json
index — This specifies the entry point HTML path.
assetGroups — Here you can the specifies assets or resources that need to be cached and specify the caching strategy, whether it should be network first, cache first, or a combination of both.
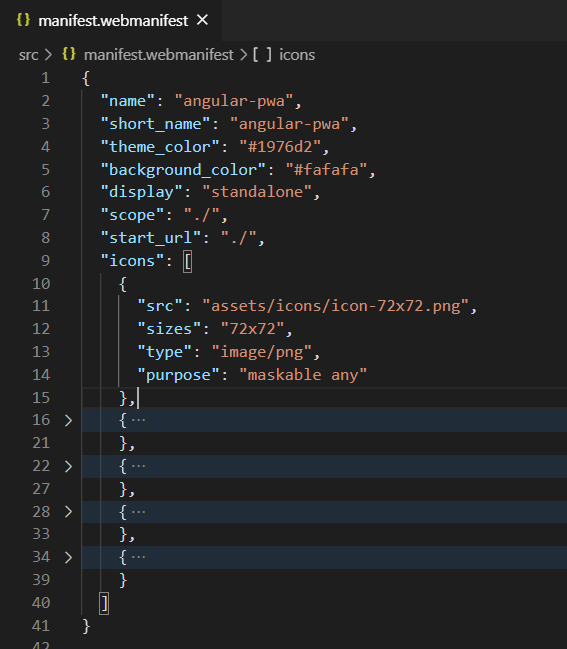
manifest.webmanifest
Primarily, it consists of how the PWA application will look when it opens up. Here you can set options like splash screen icon, background color, display, etc.
angular.json
Added src/manifest.webmanifest file under assets, so that it will be served with the site. That links ngswConfigPath and serviceWorker enabling the production configuration in build schematics.

angular.json
app.module.ts
“app.module.ts is used to import the ServiceWorkerModule for registering ngsw-config.js (only for production mode).

4. Run the application locally.
A PWA only runs on https and localhost environment. The Angular CLI is limited because the service worker doesn’t work with the ng serve command. You have to create a build and host it separately, perhaps using http-server

Reference from Angular Docs
To see a PWA in action, follow the below steps.
- Run
ng build --prodcommand. It will create files underdist/angular-pwafolder. - Navigate to that folder using
cd dist/angular-pwa - Run
http-servercommand (npm i -g http-server) - Open
We can create a script to shorten this process. Open a terminal and run npm run start-pwa command. That’s it!
"start-pwa": "ng build --prod && http-server -p 8080 -c-1 dist/angular-pwa"
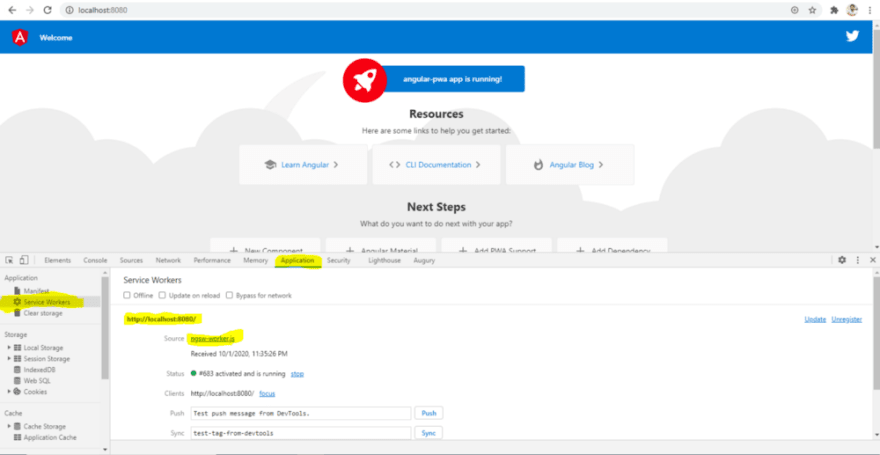
Awesome, you can see that a PWA is running on http://localhost:8080. Now open the developer console and navigate to Application > Service Workers. You can see there is a service worker file ngsw-worker.js installed for http://localhost:8080
Verifying a PWA installation
The next time that you reload the browser, all the assets should be loaded from the service worker offline cache.

Reload browser window network result

That’s great! It means that for the first time we are loading all resources, but afterwards all resources will come from cache storage.
Inside the developer console navigate to “Application > Cache > Cache Storage”. It shows a list of cached resources.

Cache Storage API helps to keep the application accessible in offline mode. Let’s make application offline from Developer Console “Network > Offline (checkbox)”
Reload the page and check what content is loaded so far.

5. Deploy a PWA to production
Deploying a PWA application to the cloud does not involve any special process. You have to create a prod build using ng build --prod and then deploy that distribution on the cloud.
Many cloud providers exist, but we’re going to deploy this application to Github using gh-pages.
"predeploy": "ng build --prod --base-href=/angular-pwa/",
"deploy": "npx gh-pages -d dist/angular-pwa"
And then run npm run deploy. And then your application will be deployed to https://username.github.io/repository-name/page. In my case, it deployed to https://pankajparkar.github.io/angular-pwa/
Note: gh-pages command throws an error, install gh-pages
npm i -D gh-pages
Conclusion
I hope you have understood how you can install and configure PWA in an Angular application. You can find the code here on GitHub.
If you like this article press 👏 clap button 50 times or as many times you want. Feel free to ask a question if you have any. Thanks a lot for reading!
Soon, I will release part II of this article which covers CI and CD with Azure
Pipeline. Stay tuned!
For more Angular goodness, be sure to check out the latest episode of The Angular Show podcast.
ng-conf: The Musical is coming
ng-conf: The Musical is a two-day conference from the ng-conf folks coming on April 22nd & 23rd, 2021. Check it out at ng-conf.org


Top comments (0)